One of my favorite designers, MochiMochi, the genius behind our little Gratis Grass, is having "bunny week" over on her blog. She asked her readers to send her any bunny-related pictures, links, info, whatever.
So I sent over that picture of fuzzy bunny, the one up there at the top of my page. I gave her the link to the pattern (don't want anyone thinking it's mine - credit where it's due) and a link to my blog.
And...
she posted it! Go check it out!
And check out the other fun bunny facts and cuteness while you're at it!
Oh, and with any $5 or more pattern purchase from her store, during Bunny Week, you get the Dust Bunny pattern for free. So I've finally ordered Tubby!
(did I use enough of these !!!! ?)
Wednesday, March 31, 2010
Snippets of Conversation
This morning in the car...
Conversation with Twin1: "Mom, you could make me a jellyfish." "Same color?" (I show him what I used, currently being knitted into another fish (3 of 6, I might just make my goal!) for the school fundraiser) "Sure...well...what else have you got?" (I don't think he quite understands the extent of my stash) "Just about anything you like, whatever color you want." "Well, purple is okay." "I've got glow-in-the-dark pale green at home" "Does it really glow in the dark?" "Yes, it does" "Yeah, that'd be good"
Conversation with Twin2: "Ugh, I hate this snow. It's all dirty." "That's because it's doing what all precipitation does, cleaning the air. All that dirt and ash from yesterday. After a while, it'll be cleaner snow." "Mom, I hope other kids have moms that can explain stuff like this to their kids" "Why?" "Because it's just sad if they don't" "You know, not all kids are lucky enough to have parents who are college educated..." (and this is where I should have stopped myself, really) "...I hope your kids are that lucky" (he gives me that look, but then goes on to make his point) "Don't other parents get tired of saying 'I don't know'?" "Back in my day, a clever parent would tell you to look it up in the dictionary or encyclopedia. Probably now they tell their kids to google it"
Back to Twin2, while stopped in the school parking lot: "I can park the car, and take that in to Grandma myself" (my mom is their school librarian, today is my parents anniversary, and I had a gift for them) "No, I don't mind. I want to take it to her"
How great is it that, a) my kids appreciate my talents, enough to ask me to make them stuff, b) my kids think I'm smart, and value that, and c) they love their Grandma, and really don't mind, dare I say, even, like? that she's right there at school?
Yet again, it just has to be said: I love my boys!
oh, and...
Happy Anniversary, mom & dad!
Tuesday, March 30, 2010
porch update
Hoping, really hoping, to get this project started soon.
Finally have an estimate. It's slightly scary. That fake wood decking stuff is expensive, but so very worth it.
Will have drawings soon, I think.
And then we will probably shrink it some. Not for cost so much as for scale. What I really want is probably too big for the house. I'm willing to adjust for the sake of aesthetics. Totally. Who wants to look at their house every day and think, "what did I do that for?" No, if it looks out of proportion, we'll re-design.
I want at least 10 feet deep on the South end. I'll settle for anything deeper than 6 feet. Because if you go any skinnier, there's not much point in having a porch.
joyfull jelly
 He was super quick, and super easy, didn't you think?
The copy I worked from had a mistake, but I checked this morning, and it's been corrected. Probably was corrected a long time ago. So in essence, no problems.
I did start mine using the magic ring, instead of ch 2. But that's personal preference, really.
I used 6mm eyes, and placed them below round 4, about 6 stitches apart. I skipped doing the rest of the facial features.
When I did the tentacles, I used stitches from round 12 to work around. I left a long tail, looped the yarn through and did my chains, and cut that off and pulled tight. Then, back up at the underside of the jelly, I looped the tail through again and tied it off tightly, so they can't get pulled out by curious children. When all tentacles are done, first trim the ends left on the chained parts, then trim the tail ends to a similar length. I thought I might like it better if he had curly chained tentacles, but after trying one, I decided that was too much for his little frame, and I did what the designer intended.
In order to get him to look like hers, you'll need to dent in the bottom a little. So make sure you stuffed him very lightly, or this could be tough.
Take a piece of yarn, about 18 inches long, and thread on yarn needle. Secure yarn in center bottom, leaving a long tail like the tentacles. Bring it up through the center, and over one stitch at top, then down through to center bottom again, pulling it up tight enough to pull up the bottom, but not dent the head. Secure yarn, and repeat. Leave a long tail again on the underside.

I like how it turned out. Probably took me all of an hour to make, including do-overs on the tentacles.
I used Caron Simply Soft, in Lavender Blue.
Monday, March 29, 2010
I'm a Quadrillionaire!
Or, at least, I would be, were it not for runaway inflation in Zimbabwe.
Saturday, Brother3 called me and said he'd found my birthday present. I'm thinking, did I not get one in November? Apparently not. (Don't you love it when your birthday extends over weeks, or months?) So he brings me over a nice little card, with 10 One Hundred Trillion Dollar bills, in Zimbabwe money. That makes One Quadrillion, right?
That makes One Quadrillion, right?What does one do with devalued currency? It's so nice and crisp, I hesitate to fold it up into rings or other crafty projects. What would you do with it?
Saturday, March 27, 2010
last of the Lolly flowers
Yet again, Lolly's projects were so cute, I could not help myself. I actually reached into my knitting bag at the office (believe me, if you knit, you keep stuff just about everywhere, because you never know when you'll have a minute) and pulled out, not the cheery red yarn (being knit into another fish), no, not even the pale lavender (not yet anything), or the white (being crocheted into bread slices), I pulled out my beige yarn, and my F hook, and crocheted this adorable rose: I honestly cannot say what made me choose the beige over those other colors. Except maybe just the general appeal neutrals have for me, or the notion that those other colors would clash with the rest of the flowers I've made this week.
 See how that fuchsia flower just doesn't fit in? Yeah. But I still LOVE it! I'm considering sewing that to the top of a knitted cupcake, in place of frosting, as a fanciful tea party sort of cupcake. I can just see how cute that would be, boxed up like real bakery cupcakes. (shoot, another project to add to my endless list)
There are a few flowers I didn't get to yet, so this is probably not really the "last of the Lolly flowers" for me. Once I dig out my floral wire and tape, I'm betting I'll have a bunch more to show off.
In other news this week for me:
Every time the Twins found me in the sewing room, and asked what I was doing, the answer was, "Lolly flowers". For some reason, they found this answer unsatisfactory.
In between crafting with Lolly, I managed to knit another fish. One of six I intend to donate to the school fundraiser which takes place May 1. I'm optimistic, but realistically, I'm not sure that was a feasible goal.
I finished reading The Help. LOVED it. Seriously, read it. You won't be sorry. It's heartbreaking at times, but, oh, so good.
Twin2 is spending the day today at a Youth In Harmony Festival, which a neighbor was good enough to take him to. Twin2 is a baritone, and a good one, too.
I filled out my tax return. It was depressing. I can't bring myself to file it yet.
For the first time this school year, I didn't have to leave work to pick up the Twins from school. A generous donor got my boys bus tokens to last them to the end of tax season so I can stay at the office and get more work done. I feel like I'm at work all the time now, but somehow, only ended up with a few hours of overtime this week. Might have something to do with various family members dropping in for their tax returns (it's okay, guys, that's what I'm here for), or something to do with taking actual lunch breaks to eat (craft?). Whatever it is, I promise, it'll get better next week.
Finally, my DVD of Fantastic Mr Fox was waiting for me when I got home last night. Even better the second time. That movie is infinitely quotable, so odd, and just a truly fantastic movie. Definitely *different*.
I honestly cannot say what made me choose the beige over those other colors. Except maybe just the general appeal neutrals have for me, or the notion that those other colors would clash with the rest of the flowers I've made this week.(The white yarn is another story altogether. I'm curious to see how many slices of bread I can crochet from one skein, because, if you recall, I've run out of white yarn twice while making slices of bread (this sounds so weird), and while I explained the first shortage, I can't figure the second, and I started to wonder just how much yarn each piece takes, so I'm determined to find out. That skein is sacred.)
I crocheted the butterfly after I got home, not having either the steel hook, or the crochet thread, to hand at the office. (I hate being unprepared, don't you?) Isn't that adorable? That tiny (1" wingspan) little butterfly is just about the cutest thing EVER, in my opinion. And could not have been easier, seriously. That's a brassy-color crinkled thread, found lurking in my stash. I've no clue where I got it, or what it is, but it appealed to me in terms of "butterfly".
Isn't that adorable? That tiny (1" wingspan) little butterfly is just about the cutest thing EVER, in my opinion. And could not have been easier, seriously. That's a brassy-color crinkled thread, found lurking in my stash. I've no clue where I got it, or what it is, but it appealed to me in terms of "butterfly".For this next one, I made the butterfly first, in this lovely pale green (hey, look at that, it's the same color as Lolly's...), and then looked around for the right color to perch it on. In person, this is even brighter pink. It's Simply Soft, in Watermelon. Same F hook, but this rose is a bit smaller. And, coincidentally, also the same color as Lolly's. Wonder how that happened? I've had so much fun following along with Lolly this week!
I've had so much fun following along with Lolly this week!Here are all the flowers I made:
See how that fuchsia flower just doesn't fit in? Yeah. But I still LOVE it! I'm considering sewing that to the top of a knitted cupcake, in place of frosting, as a fanciful tea party sort of cupcake. I can just see how cute that would be, boxed up like real bakery cupcakes. (shoot, another project to add to my endless list)There are a few flowers I didn't get to yet, so this is probably not really the "last of the Lolly flowers" for me. Once I dig out my floral wire and tape, I'm betting I'll have a bunch more to show off.
In other news this week for me:
Every time the Twins found me in the sewing room, and asked what I was doing, the answer was, "Lolly flowers". For some reason, they found this answer unsatisfactory.
In between crafting with Lolly, I managed to knit another fish. One of six I intend to donate to the school fundraiser which takes place May 1. I'm optimistic, but realistically, I'm not sure that was a feasible goal.
I finished reading The Help. LOVED it. Seriously, read it. You won't be sorry. It's heartbreaking at times, but, oh, so good.
Twin2 is spending the day today at a Youth In Harmony Festival, which a neighbor was good enough to take him to. Twin2 is a baritone, and a good one, too.
I filled out my tax return. It was depressing. I can't bring myself to file it yet.
For the first time this school year, I didn't have to leave work to pick up the Twins from school. A generous donor got my boys bus tokens to last them to the end of tax season so I can stay at the office and get more work done. I feel like I'm at work all the time now, but somehow, only ended up with a few hours of overtime this week. Might have something to do with various family members dropping in for their tax returns (it's okay, guys, that's what I'm here for), or something to do with taking actual lunch breaks to eat (craft?). Whatever it is, I promise, it'll get better next week.
Finally, my DVD of Fantastic Mr Fox was waiting for me when I got home last night. Even better the second time. That movie is infinitely quotable, so odd, and just a truly fantastic movie. Definitely *different*.
Friday, March 26, 2010
Year of Ami, week 10, J is for Jelly!
Just for fun, we'll do a Jellyfish from Ana Paula Rimoli
 and
and
this very clever Jelly Donut from Kat Knits 
I actually have been Jonesn' on this adorable lobster name of Jacques Crusteau, but he seems a tad more involved than I have time for until after tax season.
(was that the shortest post ever? I think maybe so)
more Lolly fun
Never mind how busy I am, I couldn't help myself, AGAIN, and I found myself racing for the sewing room as soon as I got home, just so I could make these awesome Lolly-style flowers!
This one might just be my favorite: I finally just gave it up, and made one in fabric I actually wear, instead of trying to make it be like something I think another crafty-type person would dig. I used scraps from one of my favorite skirts, so I know what I can wear this one with! The skirt is nothing special, the fabric is just a dark brown twill, but it fits just so, and I get tons of compliments when I wear it. One of the few "magic" wardrobe items in my closet. I keep re-making that same pattern, Simplicity 5914, it just works out so well for me.
I finally just gave it up, and made one in fabric I actually wear, instead of trying to make it be like something I think another crafty-type person would dig. I used scraps from one of my favorite skirts, so I know what I can wear this one with! The skirt is nothing special, the fabric is just a dark brown twill, but it fits just so, and I get tons of compliments when I wear it. One of the few "magic" wardrobe items in my closet. I keep re-making that same pattern, Simplicity 5914, it just works out so well for me.This next one is in paper: I don't do a lot of paper crafts, except for origami, some rockin' magnets, and an occasional card for someone special. So I don't have much at home in the way of cute papers. I did have some, though, and I leafed through until I landed on this one, and it seemed right to my 11pm tired brain. I like how it turned out. The center is actually my attempt at another Lolly flower, but I made it super small, and they were sitting next to each other, and I popped the small fringy thing into the center of the pretty yellow buttercup, and there you have it!
I don't do a lot of paper crafts, except for origami, some rockin' magnets, and an occasional card for someone special. So I don't have much at home in the way of cute papers. I did have some, though, and I leafed through until I landed on this one, and it seemed right to my 11pm tired brain. I like how it turned out. The center is actually my attempt at another Lolly flower, but I made it super small, and they were sitting next to each other, and I popped the small fringy thing into the center of the pretty yellow buttercup, and there you have it!I could not find (ie: didn't look for) my floral wire and tape, so it's just a sittin' flower for now.
Any of the flowers from Lolly's Week of Wall Flowers would look great adorning this awesome necklace:
I found the tut for this on Tatertots & Jello. The flower on this is just one of my silk flower pins I had hanging around. I think it needs something more, maybe. Twin1 says it just needs the right outfit. I keep trying it, but nothing so far. Possibly because my warm-weather clothes are away in storage right now. Possibly because it's not in fabric that goes with my boring business suits. I'll have to make another, maybe in black houndstooth. Or black velvet. Or black whatever. Or in scraps from that magic skirt.
Or maybe it just needs a Lolly-style flower:
And hey, guess what? Lolly showed off some of my flowers! Seriously! I'm blushing...
Thursday, March 25, 2010
inedible temptation

The knitted ice cream was almost as easy as the crocheted version. I did the sugar cone for this one, and chose chocolate for the ice cream color.
If you are doing the classic scoop (the same one I did here), and want to knit in one piece, leave your dbl pnts in the cone (don't forget to turn it inside out) holding the stitches until you are ready to attach the ice cream part. You won't need to leave the long tail when you start. Knit the ruffled bit of the ice cream on a circular (trust me, it's easier that way - 80 stitches in worsted don't like to stay on 3 dbl pnts) thru round 6, then, working with your dbl pnt needles, knit the stitches of round 7 together with the stitches from the last round of your cone. ie: Insert your needle through one stitch each of scoop and cone, knitwise, yarn over, and slip both stitches off their respective needles as you complete the stitch.
I was totally going to make another, and take pictures of how this works, knitting the stitches of the cone together with the stitches of the scoop, but my size 6 circulars are busy right now:
 (like how I snuck that in? I had to get this shot anyway, because it's just so funny to me)
I started stuffing after this point, and continued as I closed up the scoop. (Yeah, right back to ice cream here, like nothing fishy happened at all.)
I kinda think that ruffle is a bit much. It needs a little something there, since real ice cream has that little edge from the scooper. This just seems like overkill to me. I might have to try another, do fewer rounds before decreasing for the main body of the scoop.
I also want to figure out how to do the double scoop in one piece, if that's possible.
Wednesday, March 24, 2010
fun with Lolly
If you guys haven't discovered Lollychops yet, you are so missing out!
Sorry that's so dark in the photo. It was late. Not because it took forever to make these. Not at all. Just that I work late this time of year, so anything at home is either first thing in the morning, or just before bed.
This week, she's doing Wall Flowers Week, an entire week of crafty tutorials involving fiber flowers. I am super busy with work and all, and I still couldn't help myself, I sat right down and made flowers the last two nights.
This is the first: Made with strips of fabric folded over, gathered up, and sewn on a small felt circle on the back, just to give it stability. She's got a different color each day, and Monday was orange, which I love. I have tons of orange fabrics, but was getting frustrated looking for that "just right" print. In desperation, I pulled open a drawer of "scraps" and found these two right next to each other. Even better, parts of them were in strips already. Which I cut into 2 1/2" lengths, never mind what the width was. Ended up with half the number of mustard gingham to peachy print, and just went with it. I LOVE it!
Made with strips of fabric folded over, gathered up, and sewn on a small felt circle on the back, just to give it stability. She's got a different color each day, and Monday was orange, which I love. I have tons of orange fabrics, but was getting frustrated looking for that "just right" print. In desperation, I pulled open a drawer of "scraps" and found these two right next to each other. Even better, parts of them were in strips already. Which I cut into 2 1/2" lengths, never mind what the width was. Ended up with half the number of mustard gingham to peachy print, and just went with it. I LOVE it!This next one, you start with circles of your fabric, cut those in half, sew into cones, and gather up along the wide end. Put 9 of them together and you have a flower. I used a canning ring to draw my circles. That's jumbo ric-rac on top of the fabric cones, then a felt flower, topped with a green button. I had to mess with that ric-rac a lot before I got it to do this, so this one had to rest overnight while I pondered how to make it work. If anyone is interested, I can show you what I did. Even though that's black, with an orange print, I don't feel a "Halloween" vibe from this. It just looks good to me. I only did one of the Tuesday flowers:
  Her Tuesday color was Teal (her fav), but I didn't have wired ribbon in teal. Mostly, I have printed ribbons, not many solids at all. I'm pretty sure this would still look good in a print, but I wanted solid for my first try. Could not have been easier, seriously. You take a yard or so of wired ribbon, pull up one of the wires to gather that edge, and roll it up, sewing together as you go. I then sorta squished it to make it not so tall.
I only did one of the Tuesday flowers: Her Tuesday color was Teal (her fav), but I didn't have wired ribbon in teal. Mostly, I have printed ribbons, not many solids at all. I'm pretty sure this would still look good in a print, but I wanted solid for my first try. Could not have been easier, seriously. You take a yard or so of wired ribbon, pull up one of the wires to gather that edge, and roll it up, sewing together as you go. I then sorta squished it to make it not so tall.Here is the whole group:
Lolly is putting hers in frames, with cute paper behind them and all the stems and leaves and such going on. I'll probably make mine into brooches, dress up my boring work attire. Except, today, she's got these brilliant pom pom flowers, and those totally cry out for framing.
Go check it out. You'll be glad you did, promise!
Team Jacob rules!
I just stumbled across this post from Jen Lancaster (Ms. Bitter is the New Black), and had to share this with you. Not unlike my experience when I saw the film.
For anyone unfamiliar with Jen (whom I think I could likely be friends with, given the chance - but she lives in Chicago), she can be a bit irreverent.
For anyone unfamiliar with Jen (whom I think I could likely be friends with, given the chance - but she lives in Chicago), she can be a bit irreverent.
Tuesday, March 23, 2010
poor little misunderstood grass

The most common reaction I get to this cute little guy, sitting so serenely on my office window sill, is, "what is that?!?"
So I'll be taking him home, where he may not be subject to quite so much ambiguity.
I hope this hasn't affected his psyche too much.
Incredibly Easy Ice Cream
 Super quick, this was. I apologize for not noticing the extra steps of sewing this one together, which we all know I am not a fan of. I mulled over how to do in one piece, at least the main portions, but decided that where crochet is concerned, increases look so much better than decreases. Consequently, it may be worth the 30 little stitches to sew the cone to the ice cream. It's hidden anyway, by the separate little ribbed band, so you don't have to try to make the stitches invisible - just whip stitch it. Make sure you leave a long tail on the cone to use when you sew them together.
With the way the little "cuff" on the cone is, no option but to sew it on after, since it is made like a tiny scarf and then wrapped around. Worth the effort there, too. Leave long tails at the start and finish, so you have plenty to sew with along the top and bottom of the cuff. I needed 30 rows to fit my cone, so don't stress if yours comes up short, or long, after 28. Just carry on until it fits, or rip it back, if that's the case.
The little curly top, which is your starting point, had me questioning the design at first. Why in the world would you crochet it flat just to sew it together? And just for the first 9 rounds? I followed the directions like I should, though, and it worked out fine. Leave a long tail when you start, so you have something to sew it up with and tack the tip down. I didn't sew the first 4-5 rows together, since it seemed a bit of a strain for the edges to meet up; I ran the yarn down a few rows first. Then, instead of running it back up, I ran it through the tip and tacked that down right there. I know how I did it, and I still have a hard time seeing that it's only a flat piece of sc right up at the top. It totally works.
The cone shape could be changed to a flat bottom. Start with 6sc in magic loop (which I did with this, even though it says ch 2, work 6 sc in 2nd ch - you can always change that to be however many sc in magic loop instead), increase around (12), then *sc 1, inc*, repeat around (18), work one round without increasing, in the back loops, and then carry on from there, working rounds 8 thru 18 as written. I'll do one this way, and let you know if it ends up too top heavy or something. That's the only drawback I can see to this modification, but you never know.
We already know I crochet tight when I do toys. Mine is only 6" tall. When I do that other one, with the flat bottom cone, I'll probably add a section, repeat rounds 15 thru 24. Because when I have myself a soft-serve at Jason's Deli, I usually make it have three little ice cream bumps. Don't you?
Monday, March 22, 2010
Nature Girl
I like Carl Hiaasen. I loved Hoot. He's very good, has nifty historical details and a lot of "save the planet" material worked in so that it seems normal. I like that.
But why, I often wonder, do male writers feel the need to write about sex so darned much? Or to spell out all the gruesome details of some injury for you?
Both of these, in abundance, make this totally inappropriate reading for not just my boys, but possibly a lot of my adult friends.
Perusing the titles of his other works, it strikes me he may be the Michael Moore of literature. Okay, if you like that sort of thing.
At least I have nothing to complain about as far as the writing skills. Good solid story.
Saturday, March 20, 2010
Year of Ami, week 9, I is for Ice Cream!
I've crocheted some ice cream cones before,  but this Chocolate Pie & Ice Cream pattern from Coats & Clark is new to me.
  Go ahead and crochet that chocolate pie while you're at it - this one looks somehow nicer than a lot of fiber pies I've seen. Must be that cute little crust ruffle.
but this Chocolate Pie & Ice Cream pattern from Coats & Clark is new to me. Go ahead and crochet that chocolate pie while you're at it - this one looks somehow nicer than a lot of fiber pies I've seen. Must be that cute little crust ruffle.I've knitted one lovely swirl cone  from I Like Lemons Scooped pattern, that looks so good, it's tempting to bite that little curly top right off.
from I Like Lemons Scooped pattern, that looks so good, it's tempting to bite that little curly top right off.I know I am supposed to be making stuff I haven't made before, but I'm going to include these in the challege anyway, as I haven't made this particular crocheted cone, or indeed even this style of crocheted cone, and have only made the one knitted variety.
I promise, I'll do one of the others from the knitted collection,  I won't just put up pics of the finished one and tell you all how easy and fast it was. Even though it was. Both fast and easy - I made it in one sitting, at Fab Fibers. I was working on something else, but I'd grown bored with it, so instead, I pulled out the Scooped pattern and my trusty Vanna in white and beige, and before I knew it, I had ice cream.
I won't just put up pics of the finished one and tell you all how easy and fast it was. Even though it was. Both fast and easy - I made it in one sitting, at Fab Fibers. I was working on something else, but I'd grown bored with it, so instead, I pulled out the Scooped pattern and my trusty Vanna in white and beige, and before I knew it, I had ice cream.*update* pics of my own creations added after-the-fact for reference
Friday, March 19, 2010
Helpful Hot Dog Hints
The knitted hot dog is so simple, so foolproof, there's not much to tell. I just wanted to see how many "H" words I could use in my title.
Finally cast on last night, and within a couple hours, I had a string of 3:  Didn't bind off, as I want at least 6 before I consider it done. This morning I decided I wanted a single as well, so I grabbed the other end of the skein and cast on for another.
Didn't bind off, as I want at least 6 before I consider it done. This morning I decided I wanted a single as well, so I grabbed the other end of the skein and cast on for another.It's a little on the thin side, I was running short of stuffing. This looks so skinny, I may have to poke some more in there later. I never do seem to learn to re-fill my stuffing bag before taking off with my knitting; there's really plenty at home. Perhaps I need to have a Magic Drawer at work, like MochiMochi? Except, if I'm at work, I'm at my office, which is not so much a fiber design studio as it is a professional accounting office, and my bosses might thinking a drawer full of stuffing is just too weird.
I was running short of stuffing. This looks so skinny, I may have to poke some more in there later. I never do seem to learn to re-fill my stuffing bag before taking off with my knitting; there's really plenty at home. Perhaps I need to have a Magic Drawer at work, like MochiMochi? Except, if I'm at work, I'm at my office, which is not so much a fiber design studio as it is a professional accounting office, and my bosses might thinking a drawer full of stuffing is just too weird.Vanna in Brick again. I count 40 rows total for my single, which measures 6" in length, including the little knotted sausage ends. Stuff as you go, a little bit at a time. I used my tail from my cast-on to tie up the first end. Thread that tail inside and come out in the 3rd row, then run the yarn over and under the stitches of that same row. Pull it tight, wrap the yarn around a couple times, tie off, and thread the end back inside. I used the cast-off tail for the other end, same process.
Random Thoughts of an Almost-Spring Morning
My daily commute takes me past a Kneaders Bakery. Kneaders is also a sandwich/soup shop.
This morning, the sign advertising their specials reads, "White Rabbit Steamer".
What first runs through my head is "Fatal Attraction". I suddenly have this vision in my head of that poor white bunny in the big steaming soup pot. I'm thinking, well, I won't be having lunch there anytime soon. Not sure I want my breakfast now, either. This all runs through my head very quickly.
In an effort to think the best of folks, I pursue a line of thought that makes this sign okay, first landing on "springtime" as an excuse, considering briefly that they are selling some kind of bunny-inspired Japanese steamer basket which you could use to revive stale bread at home. This seems too far-fetched. But for the life of me, I can't picture what kind of food item could justify this name, or how they envision it works for the rest of us. Directly below this dubious item had been "latte" - which I reason could be a clue.
It's a full two blocks before it hits me.
Alice!
As in, the White Rabbit, the tea party, Alice in Wonderland. Which I have not yet seen in it's latest Tim Burton incarnation.
I wondered, did they consider that? The possibility that a passing potential customer could 1) not have seen this film yet, and 2) may not know they now sell such things as steamed milk and lattes?
Makes my entire morning when I walk in to work to find they've gotten us Kneaders for breakfast.
PTA fundraising gets ridiculous
Brief story on NPR this morning about a PTA group in NYC protesting a ruling having to do with how they can no longer sell their home-baked goodies at fundraisers for their schools. You can sell pre-packaged stuff, like Twinkies and Doritos, so the argument about watching out for the kids, worries over childhood obesity, etc., doesn't hold up. These moms were out in front of City Hall selling their home-made vegan chocolate cake, organic chocolate chip cookies, and other such appetizing, sugar-filled baked goods, served up with a healthy dollop of how-ridiculous-is-this-ruling.
The reporter ends by saying that you can't buy art supplies with broccoli and Brussels sprouts.
Which suddenly seems like a great idea.
Why not have a farmers market for school fundraising events? I'd buy local veggies to support my school. Wouldn't you?
The reporter ends by saying that you can't buy art supplies with broccoli and Brussels sprouts.
Which suddenly seems like a great idea.
Why not have a farmers market for school fundraising events? I'd buy local veggies to support my school. Wouldn't you?
Thursday, March 18, 2010
What color is your hot dog?
I tried one out in Rust, and it's just not right. It looks like a boiled hot dog. Not so appetizing, to me. I know that if I lived somewhere that had hot dog vendors on the street corners, a boiled dog is what I'd be used to, visually. But I don't. And I don't boil mine. I grill them, or I microwave them. And I don't tend to buy plain - they're usually the polish dogs. Or at the very least, all beef, and therefore more towards red than not.
and it's just not right. It looks like a boiled hot dog. Not so appetizing, to me. I know that if I lived somewhere that had hot dog vendors on the street corners, a boiled dog is what I'd be used to, visually. But I don't. And I don't boil mine. I grill them, or I microwave them. And I don't tend to buy plain - they're usually the polish dogs. Or at the very least, all beef, and therefore more towards red than not.I finished my version in the Brick color I started with: and I think it's fairly realistic, if a bit on the stumpy side. I suppose you could say it's kid-sized.
and I think it's fairly realistic, if a bit on the stumpy side. I suppose you could say it's kid-sized.A little tip for you: start by making the bun, and adjust the length of the dog to fit. I ended up doing 20 plain rounds. Have not had a message back from designer yet, but this isn't a big deal. You can always add or subtract rounds, and gauge is sort of a personal thing, unique to each of us, and for me, tends to change depending on my mood. You can kind of see that right here - the dog is puffier towards the left, at the end of the piece.
The bun is super cute:  Leave a long tail when you finish the white part, and use that to stitch the two parts together around the edge. Once they're both assembled, stitch them together, using a whip stitch, along one side. On mine, I stitched along the center 14 stitches only. I used white, but I think beige might hide better from the outer view.
 A little too puffy for realism, in my mind. I think if I made more, I'd cut it back a row, maybe even two, on the beige portion to make a flatter bun. As is, it makes the perfect fiber Twinkie, if you did the white part in beige as well, or the entire thing in pale yellow, and added some white dots on the flat part. I see some Twinkies in my play food future, definitely.
Leave a long tail when you finish the white part, and use that to stitch the two parts together around the edge. Once they're both assembled, stitch them together, using a whip stitch, along one side. On mine, I stitched along the center 14 stitches only. I used white, but I think beige might hide better from the outer view. A little too puffy for realism, in my mind. I think if I made more, I'd cut it back a row, maybe even two, on the beige portion to make a flatter bun. As is, it makes the perfect fiber Twinkie, if you did the white part in beige as well, or the entire thing in pale yellow, and added some white dots on the flat part. I see some Twinkies in my play food future, definitely.Wednesday, March 17, 2010
Katamari Birthday Cake
I had this idea weeks before their birthday. I loathe all things video game, but I know how much the Twins love them, and this game especially. I knew it was the right cake for them, to show my love. (For those not familiar with this game, google it - I can't explain - I'm not a fan, I don't play, I am just aware of the game and it's objects.)
With my sisters recruited to Team Birthday Cake, the secret plan was on.
I have the Wilton Ball cake pan - and have used it and used it, for so many cakes, I don't even know anymore. Last year, a beach ball for my niece. A few years back, a Golden Snitch for my Harry Potter obsessed boys. There is nothing you can't do with a nice ball shape cake.
I knew it would be easy, but I needed the right confection to use for the little nubs. I pondered that for a while. I didn't want to make an extra sheet cake and cut out my own little circles, though I would, if that was all we could do. I was certain there would be something in the snack cake aisle that would be the right size and shape. And there was! Ever heard of 100 cal pack Twinkies? They come in a box of 6 pkgs, each pkg has 3 little round Twinkies, about 2" in diameter. Exactly the size we needed. (they do NOT taste like a Twinkie. consider yourself warned.)
We got a bit of a late start Friday (family celebration to take place Sat noon), and were up until about 3 am. We had tons of fun choosing stuff to stick into it. Some of it was new, some of it came from this drawer of assorted happy meal toys and such, which I'm sure I should have tossed ages ago, but just haven't gotten to yet. Yes, we washed the toys before sticking them in.
This is how it turned out:
Note Catwoman on the lower right, about to fight with Jackie Chan, just on the other side of that nub. And the headless Strawberry Shortcake just to the right of center. Her head is on there somewhere, too. On the upper left, TRex is ready for ice cream, with his little tasting spoon.
I have other views of this, other angles, but this is my favorite.
The celebrants got to take home whatever was on their piece of cake, if they so desired.
Wondering just how you cut and serve a cake like this? You just start scooping chunks out with your cake server.
And the Twins? They totally loved it.
Twinkie Dogs, anyone?
My hot dog bun is about Twinkie sized.
(mmmm.....Twinkies....)
Maybe a tad bigger, but still, not quite big enough to be a hot dog bun. I haven't any hot dog buns handy to compare it to, but I'm pretty sure the last ones I had were bigger than a Twinkie.
Must be that I crochet a bit on the tight side. Because otherwise the stuffing would show through, or possibly even poke out.
I still maintain you need more than 13 rounds to get your hot dog to the right length. Even if the bun does end up Twinkie-sized.
The stitch marker in the photo is at the end of the 13 rounds. And in this picture, my dog looks very red, but it's not that way in person. I pulled out a skein of Vanna in Rust, suggested by someone as a good color for a hot dog. It looks icky to me, as a food color. But maybe I'll try it, see which one looks more realistic as a finished fiber food.
This whole Twinkie thing has me thinking....On NPR's Wait Wait a while back, they had on Paula Deen, this southern chef. She had invented a "Ladies Brunch Hamburger", with a fried egg on top, and for the bun she'd used Krispy Kremes. Seriously. Which brings up the whole idea of a hot dog in a Twinkie, possibly deep fried (that woman will deep-fry anything). Lunch, anyone?
Monday, March 15, 2010
hot dogs having issues
Just started on this project, and already I have a problem.
There is another crochet hot dog pattern, from Beansprout Creations, and her dog has 29 rounds of sc. I like Bittersweet's bun better, so that's why I went with that one. But for reference, we could go with that length. Beansprout also has nice directions in her pattern for the mustard/ketchup squiggles, if you're at a loss for how to do those.
I skipped making the bun, and started with the dog itself. Think what you want about that - I justify my choice by reasoning that, should I run short of time this week - as is wont to happen when it's tax season, I will still manage to make the hot dog - even if it's just the dog.
Anywho..
After working the specified 13 rounds of plain sc, the darn thing is only as long as my index finger:  Which, if memory serves me, is a tad short for even a cheap hot dog. It's a great size for, oh, I'd say, link sausage. Like what you might use to make pigs-in-blankets. Wrong color, right length.
Which, if memory serves me, is a tad short for even a cheap hot dog. It's a great size for, oh, I'd say, link sausage. Like what you might use to make pigs-in-blankets. Wrong color, right length.Squinting at the pictures, I count at least 23 rounds plain sc, I think.
Left a comment for the designer. Will update when I know what's what.
There is another crochet hot dog pattern, from Beansprout Creations, and her dog has 29 rounds of sc. I like Bittersweet's bun better, so that's why I went with that one. But for reference, we could go with that length. Beansprout also has nice directions in her pattern for the mustard/ketchup squiggles, if you're at a loss for how to do those.
I'm using Vanna in Brick for my hot dog. Pretty good color choice, I think.
Gratis Grass, Fin!
Finally, got this baby felted.You can actually see a difference in size! Also in the stitch definition. I love the look of a felted/fulled wool, don't you?
  Our new little friend does.
Also in the stitch definition. I love the look of a felted/fulled wool, don't you? Our new little friend does.The felting/fulling saga:
I gave up trying to wait it out with normal laundry loads. In my defense, though I realize almost all felting (ahem, that should really be "fulling", but it's been so long since anyone used the correct term, not many would know what I meant) is meant to be done in hot water, or at least warm, I have also had the experience, vicariously, of having something you thought to be washable, having washed and dried it half a dozen times with no discernible change, suddenly shrink for no apparent reason. At which point someone finally reads the care label, and says, "hmm, looks like this is 100% wool, dry clean only..." I say "vicariously", because I always read care labels (seriously, I do - that's an investment, not just a piece of clothing), so this has not happened to any 100% wool garments in my care. Perhaps to one 100% linen pair of pants, disguising itself well as "fake" linen pants until the moment it was pulled from the washing machine, (I knew I should have recycled the "fake" pair the minute I brought the "real" pair home...) but never to anything made from wool. Promise. Point is, it can happen. The shrinking/felting thing, I mean, even if you don't put it in hot water. It just wasn't happening fast enough for me this time.
I tend not to wash in hot unless it's a bleach wash, which would be disaster for poor little Gratis, so I had to get inventive. First I did a load of towels, and just held our grassy friend under the hot water as it filled the washing machine (all before adding the bleach so necessary to happy towels) and gave him a little gentle rubbing now and then. That actually made a big difference just doing that. No picture for you, sorry. It was still not quite enough, though, so I paced the floor trying to come up with another idea.
Finally, I grabbed the sheets from Twin1's bed, reasoning that they could 1) do with a wash, and 2) bright blue tie-dye sheets don't want bleach. Hot water may not have been part of that care label, either, but hey, they're just sheets.
Popped dear little Gratis into a zippered case (in truth, this is a packing case I use when I travel, but it's smallish, zips all the way shut, and it's handy), and started up the washing machine. I didn't stand by to check the progress, since I had no real need to stop it before it was too small. It's a toy, so if it went too far, who would know?
Before tossing in the dryer, I checked to be sure it had gotten somewhere, 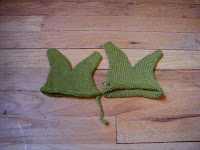 put him back in his little washing case, and let the dryer run it's course. Looks just right to me. And pretty darn cute, I think. (The sheets came out fine, too - they're still bright blue, and they still fit the bed, so no harm done.)
  His eyes are 3 strands black floss. I back stitched a circle, roughly 1/2" diameter, and filled in with satin stitch. I could have used safety eyes, but I like how this looks, too.
put him back in his little washing case, and let the dryer run it's course. Looks just right to me. And pretty darn cute, I think. (The sheets came out fine, too - they're still bright blue, and they still fit the bed, so no harm done.) His eyes are 3 strands black floss. I back stitched a circle, roughly 1/2" diameter, and filled in with satin stitch. I could have used safety eyes, but I like how this looks, too.I have two others to felt/full and add some personality to, including the one hiding behind Gratis - he's a little experiment in a no-seams version, not even the bottom, so he's stuffed already, lightly, and we'll see how that holds up. Could be disastrous, but I'm willing to risk it. Guess I'll wash my sheets this time.
Saturday, March 13, 2010
Year of Ami, week 8, H is for Hotdog!
Hoping it would be hearts? Ha!
(not in a "heart" sort of mood)
We will be happily constructing the hot and tasty (calorie-free!) little pups following these helpful recipes:
sadly bun-less Frankfurters by Licensed to Knit
and
 fully dressed, mustard squiggled, Hot Dog! by Bittersweet
Bittersweet has an amazing collection of patterns. If you've not visited her before, I insist you spend a little quality time over there. Your inner knitter/crocheter will thank you. So will your inner Vegan, if your tastes run that direction.
*update* pics of my own creations added after-the-fact
(not in a "heart" sort of mood)
We will be happily constructing the hot and tasty (calorie-free!) little pups following these helpful recipes:
sadly bun-less
Frankfurters by Licensed to Knitand
fully dressed, mustard squiggled, Hot Dog! by BittersweetBittersweet has an amazing collection of patterns. If you've not visited her before, I insist you spend a little quality time over there. Your inner knitter/crocheter will thank you. So will your inner Vegan, if your tastes run that direction.
*update* pics of my own creations added after-the-fact
Birthday Gift Scenario 1
It went like this:
Brother4 emails me and asks what Twins want for B-day. I give him the short list, tell him what is probably already taken care of, and also suggest that they would love anything from ThinkGeek.com. Which is true.
A few minutes later, he emails back, asking if they would enjoy the Titanium Spork. If they didn't already have one, that is. (Possible in our family.)
I say that, no, they don't have one already, and yes, they would love one.
And here's where it gets truly geeky:
Brother4 replies that he'll go ahead and get those, then, because "ThinkGeek has this slide rule which I've always wanted."
Yeah, you read that right. My brother has always wanted a slide rule.
Even more geeky: the Twins both LOVED their sporks.
Beyond geeky: by the time we celebrated their birthday, Brother4 had already learned to do some slide-rule calculations.
This? is my family. And I love it.
Friday, March 12, 2010
The Grass is always Greener on the other side of Tax Season
Why don't I have a finished knitted Grass to show you just yet, even though it's Friday already?
It's fairly simple.
I'm actually knitting my third little Gratis Grass. So you'd think I'd have at least one finished one to show off. But, I do not.
It's the felting.
I've washed and dried twice now. I still see only the very slightest difference; twice-washed item on the left, fresh-knitted on the right: (unlike the knitted baby cocoon that insta-shrunk, even though it should have been washable).
You'd think washing and drying a little knitted piece wouldn't be a big deal.
Let me 'splain.
It's tax season. ('nuff said)
What does that have to do with my laundry habits?
Well, let's just say, for those not aware of my life-in-general, tax season, being the time of year I am the least at home and seem to spend the bulk of my time at my office, is generally the time of year I buy new underwear. Because when you run out of clean underwear, you absolutely must do one of these two things: 1) laundry, or 2) shop for new undies.
I ask you, is there really a choice?
It's fairly simple.
I'm actually knitting my third little Gratis Grass. So you'd think I'd have at least one finished one to show off. But, I do not.
It's the felting.
I've washed and dried twice now. I still see only the very slightest difference; twice-washed item on the left, fresh-knitted on the right:
(unlike the knitted baby cocoon that insta-shrunk, even though it should have been washable).You'd think washing and drying a little knitted piece wouldn't be a big deal.
Let me 'splain.
It's tax season. ('nuff said)
What does that have to do with my laundry habits?
Well, let's just say, for those not aware of my life-in-general, tax season, being the time of year I am the least at home and seem to spend the bulk of my time at my office, is generally the time of year I buy new underwear. Because when you run out of clean underwear, you absolutely must do one of these two things: 1) laundry, or 2) shop for new undies.
I ask you, is there really a choice?
Thursday, March 11, 2010
Networking Pays! (again)
I am a winner! Again. I'm just that kind of lucky, I guess.
WBN Luncheon today, Nothing But Networking - which is always fun. So many people to meet and to get to know better. Some great stories, little glimpses into the lives of these fantastic women.
And I won movie tickets.
Hurrah for me!
WBN Luncheon today, Nothing But Networking - which is always fun. So many people to meet and to get to know better. Some great stories, little glimpses into the lives of these fantastic women.
And I won movie tickets.
Hurrah for me!
Gratis Grass and the felting experience
I've knit up two versions, trying out different ways of knitting in the round. Did one without taking out the "extra" end stitches - considered as an aid in sewing together. That one looks decidedly more robust (on the left). The one with the "extra" taken off the ends is quite slender by comparison.  I also tried different directions for the decreases, and have decided that they need to lean away from each other, in the direction of the curl of the grass. Otherwise, you get some gaps.
 Speaking of gaps, be sure you stitch up the little gap between the blades.
  I did some duplicate stitch sort of stitches, but crossing between the front and back, and side to side. It's not going to matter too much what you do here, once it's felted, so don't stress over what stitches you do to close it up. (boy, what a difference it makes to have it in natural light - I promise, that's the exact same knitted grass as the one on the right in the first picture, just taken in a different location.)
I also tried different directions for the decreases, and have decided that they need to lean away from each other, in the direction of the curl of the grass. Otherwise, you get some gaps.Speaking of gaps, be sure you stitch up the little gap between the blades. I did some duplicate stitch sort of stitches, but crossing between the front and back, and side to side. It's not going to matter too much what you do here, once it's felted, so don't stress over what stitches you do to close it up. (boy, what a difference it makes to have it in natural light - I promise, that's the exact same knitted grass as the one on the right in the first picture, just taken in a different location.) I threw one in to the wash to felt it. It's not noticeably smaller after just one run through the washer and dryer. The one on the left is the one that's been through the wash. It's more wrinkled, but certainly not much smaller.  I am not one of those types that can just wash what I'm felting - it hurts my conscience to run anything but a full load. Not to worry, though - plenty of dirty clothes handy to throw in with my little grassy friend for another go at it.
I am not one of those types that can just wash what I'm felting - it hurts my conscience to run anything but a full load. Not to worry, though - plenty of dirty clothes handy to throw in with my little grassy friend for another go at it.I also tossed in one of the baby cocoons I'd knit last week. It was in bamboo and wool blend, and only when I was almost done with it did I remember to look at the washing instructions. Because anything for a baby should be easy care, as it will likely need doing hundreds of times over. It wanted: hand wash warm, lay flat to dry. Sure, that'll happen. So I didn't gift it, I set it aside to see how it held up under "normal" washing conditions instead. After all, it does say it can take warm water, and I generally wash in cold. Oh. My. Goodness! Did it ever shrink! I pulled it from it's little zippered bag, just to see how it held up, before putting anything in the dryer. I left it laid out to dry instead, fearing it may not even fit a doll by the time it's done if I tried to dry it even on low heat. Just one wash, and it lost at least 3 inches in length. My stitches look really nice and even, though. But, yeah, that yarn is not for baby stuff. Not in my world, anyway. Wonder how small it would get before it was done shrinking? Should I find out?
Wednesday, March 10, 2010
Birthday Times Two
Today's your birthday! da da da da dut da! It's my birthday too! da da da...
Oh, wait, it's not MY birthday. No, it's the twins' birthday, hence the "times two".
I put up my scrabble letters spelling out this message on the mantle: Birthday Times Two.
It now reads: death to my wit ribs. Or sometimes it reads: death to my wit sir B.
(I so wish I had a picture to put up with this - will take one later if I can)
They get extra points if they use ALL the letters when rearranging my scrabble messages. Points for what, I don't know. But it's fun.
Our first encounter with this little game of our own at home, was "Tis the Season", which morphed into "Stesha toes in". No leftover letters - that's a real name, she's my niece.
I love having such clever kids.
Who are possibly not technically kids anymore, as today is their 18th birthday.
Happy Birthday boys! I love you more than I can say.
Monday, March 8, 2010
gorgeous gull
Gosh, this gull was easy! Well, easy, once I'd figured out what that chart was trying to tell me.
Well, easy, once I'd figured out what that chart was trying to tell me. I was confused, a bit, at first. But then, I saw the light; and now, I'm going to share.
First helpful hint: you're starting at the bottom of the gull, not his head. If I'd only known that from the get-go, I might have made one of these months ago.
The first 7 rounds were easy, no problems there. Increase rounds just like other circular stuff.
But then came the mystery of round 8. If I decrease to 12, how in the world am I going to get anything like a gull? Let's look at the chart. What it says next to that 12, is not -12. No, it's just 12, followed by a bunch of characters that mean...I have no idea. But I needed to figure out what it was trying to tell me, or I'd never have a gull. And I needed to have one - look how cute it is!
What could it mean? I'd like to say I researched this, looked in Japanese ami books that had been translated to English, compared notes, that sort of thing. No, I didn't. I stared and stared at the picture of their gull, and at the diagram next to the numbered rows, which has even more characters I don't understand, and suddenly wondered if it meant I was supposed to skip those other 12, just leave them unworked, and go on from there.
So I tried that, working in the first 12 sc, and starting the next round on top of the first stitch from round 8, basically ignoring the other 12 sc. I continued to the end, and look what I got: Yup, a semi-gull-shaped sort of thing (maybe also a snail sort of shape...hmm). Which is when I figured out, after looking VERY closely at their pictures again, that I probably would have figured this out sooner if I'd only realized we were starting at the bottom, and not the head. Which I then realized I should have known from the order of the rows in their chart, and the diagram next to it. Except, for all I know, they all look like that, even when you start from the top or center of something. And maybe they do, and maybe all of them start at bottom. Makes sense.
Yup, a semi-gull-shaped sort of thing (maybe also a snail sort of shape...hmm). Which is when I figured out, after looking VERY closely at their pictures again, that I probably would have figured this out sooner if I'd only realized we were starting at the bottom, and not the head. Which I then realized I should have known from the order of the rows in their chart, and the diagram next to it. Except, for all I know, they all look like that, even when you start from the top or center of something. And maybe they do, and maybe all of them start at bottom. Makes sense.Anyway, from there, so very easy.
Except, he ends up a little top-heavy. How to make him sit up?
He's a tad small to put a little nylon sack of pellets in, as the knotted bits of the nylon would over-stuff him. And you've got to contain those plastic pellets, or they'd just leak out between the stitches. Something else heavy was needed.
A little rummage through the tool box, and I came back with a heavy bolt, which looked like just the thing. Stuff his head first, all the way up in there. Then a little down his "neck" towards his back. Then tuck that bolt in there with some stuffing,
 put a little more on top of that, and stitch him up.
 See? he sits up!
Stuff his head first, all the way up in there. Then a little down his "neck" towards his back. Then tuck that bolt in there with some stuffing,put a little more on top of that, and stitch him up.See? he sits up!Now for that face. Not much help there, from either the pictures, or the drawing next to his charts and diagrams. Here's what I was finally satisfied with, after three tries: Centered on his "face", eyes roughly centered between top and bottom of his "head", with about 5 stitches between them, worked over two rows, stitch over them twice. I used brown cotton yarn, same weight as the yarn used to crochet. His beak is yellow cotton yarn, same weight again, and stitched over two sc, across the center of the row between his eyes. I tried it lower, like the drawing shows, but it wasn't working for me cuteness-wise.
 Then I made the wings, and of course, forgot to take pictures of wings. But this part of the graph was really easy to read, since American crochet graphs are just the same. The little oval = ch, X = sc, T = hdc, and the T with the extra line across it = dc.
Centered on his "face", eyes roughly centered between top and bottom of his "head", with about 5 stitches between them, worked over two rows, stitch over them twice. I used brown cotton yarn, same weight as the yarn used to crochet. His beak is yellow cotton yarn, same weight again, and stitched over two sc, across the center of the row between his eyes. I tried it lower, like the drawing shows, but it wasn't working for me cuteness-wise.Then I made the wings, and of course, forgot to take pictures of wings. But this part of the graph was really easy to read, since American crochet graphs are just the same. The little oval = ch, X = sc, T = hdc, and the T with the extra line across it = dc.Translated, this graph would read:
Your very own, very quick, gorgeous gull.
ch 7, starting in second ch from hook and working one st in each ch, sc 2, hdc 2, dc 1. In last ch, (dc, ch 1) 3 times, dc. Now, working on opposite side of chain, dc 1, hdc 2, sc 2. Join with slip stitch to first sc.
See? pretty easy. Make two of them, or he won't be able to fly very well.
Sew one to each side of gull. I sewed them starting from the first dc at the top, around to the tip of the wing. I didn't sew the top of it, I left that open. Sewing the wings on seemed to help him sit up a little straighter, too.
And there you have it!
Your very own, very quick, gorgeous gull.
He's about 2.25" tall. I used a size E hook. Yarns used for my gull: Lion Brand Cotton Ease in White and Lake; scraps of brown & yellow for his face, pulled from my baggie of yarn scraps, probably Lily Sugar N Cream. The bolt used to weight him was 3/4" long, and fairly hefty.
I think he's a keeper. Even without the little flower on his head.
Maybe he needs a friend, of the female persuasion, and she can have a little flower on her head.
Subscribe to:
Posts (Atom)


