Saturday, April 30, 2011

Fish Custard

For the premier of the new season of Doctor Who, I whipped up a little snack:

It's what any fan of the Doctor would want to nosh on while watching the latest episodes on BBC:

Fish Custard!

This version is basically a little more delicious to the rest of us that aren't in the middle of a regeneration, and it's super easy to make.

Custard - just whip up your basic instant pudding, using just a tad more milk that usual so it's not super-thick. I used vanilla for authenticity, but you can use any flavor you like.

Fish Fingers:

Bake (or buy) a pound cake loaf and let it cool. (I usually make the kind in the box - Betty Crocker?)
While it's cooling, crush 2 packages of graham crackers until you've got fairly fine crumbs, and put them in a shallow bowl for later
Cut pound cake into 1" or thicker slices
Cut each slice into 1" or wider strips
melt 1 stick of butter in a shallow bowl
dip each cake strip into butter, then roll in graham cracker crumbs (you may need to melt more butter before you're done with the whole loaf, but I can't remember)
let your fish fingers sit for a minute to set up, and serve with a bowl of custard for dipping

Pretty easy, right? and tasty, too. I thought I'd have to brown them in the oven, but just letting them sit a minute sets up the butter & crumbs just right.

Friday, April 29, 2011

scratch that itch

I've got a million things going, crafty and otherwise, and yet, I still get an itch to do something....

something new, something different, something....

something that isn't what I'm doing, whatever that is.

This morning, it was an itch to make a toy. In yarn. Because, I guess, I just don't have enough of those things in my small-child-deprived household.

And maybe because toys are quicker to finish than say, socks.

(Especially socks that one had to start over after knitting 4 1/2" of both socks before realizing said socks were going to be too big for the intended recipient.)

Today, I'm crocheting a cheeseburger. And tater tots. Because I can.

Tuesday, April 26, 2011

Six of one, half dozen of the other...

I enjoyed making up my own little basket of Stuffed Eggies.

I wasn't sure at first how many I wanted, but after some thought, I figured any multiple of three was probably good, so I started in on the fabric collection with that in mind. It took a while, but I finally came up with 6 fabrics I liked as a group.

I then cut 4 pieces from each fabric, so I could have 6 eggs, using 2 different fabrics on each one.

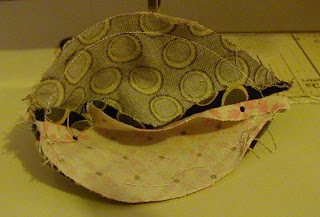
Her eggs look a little pointy at the small end, which I don't love. I suggest sewing together two sets of egg pieces, and then sewing those together as shown here:
to get a more rounded egg. Her directions tell you to sew each piece on as you go, stopping and starting at the dots, but because of size of the smaller end, you end up with a point at the top if you do that. Also, sewing them together my way means you can start just down from the middle of one side, go all the way around the rest of the egg, and stop a couple of inches away from the start, leaving a decent opening for stuffing, without having to do a lot of start-stop-start.

I stuffed these a little more than my usual, just to get the seams to go smooth. They're still squishable, just more firm than usual.

*yes, I made the basket, too. It's just your basic egg basket, made on 6" hoops, #6 round reed for ribs, and 3/16" flat reed for weavers, all oak. I get my supplies from The Country Seat. I first learned basket weaving in college, and have since used many of the patterns in The Basket Book on my own.

Monday, April 25, 2011

All My Chickens, Week 13, Simple Cross-Stitch Chicken

A very basic, beginner level project. Cute, too.

This shouldn't take long at all.

If you're new to Cross Stitch, DMC has a good beginners guide, including a link to a video that takes you from separating thread to stitching, including back stitching. While you're there, check out their library of free designs! They keep it pretty fresh - always new designs bumping old ones off the list - so check back frequently if you're fan of this art.

*pic of my own creation added after-the-fact*

Wednesday, April 20, 2011

My Review of 20" Addi Turbo Circular Knitting Needles

Originally submitted at Alpaca Direct

Lifetime guarantee Flexible Nylon Joins Circular Knitting Needles Lightweight comfort 20" Length


love these needles!

By bookette from Provo, UT on 4/20/2011


5out of 5

Pros: Easy To Use, Stores Easily

Describe Yourself: Quality Oriented

Primary use: Personal

Was this a gift?: No

I've been making a large cowl with these, and came to the part in the pattern where I had to switch up a size (due to different stitch pattern). My 8's are not Addi's, nor do they have the shorter needle, and now I wish every circular I owned was an Addi. Worth every cent.

(legalese)

Tuesday, April 19, 2011

Flirty Sash how-to

I like this sash so much, especially when compared with the boring, practical, straight ties, that I paused and took pictures during a recent apron-making adventure, so all of you can start making aprons, or dresses, with this more feminine touch.

(Excuse the light-quality, please. It was night, and I turned on every light I could think of in my sewing room, but there's still some yellowing and a few shadows. Sometimes the lack of a flash is a good thing, other times, not so much.)

First, you'll need to cut your sash pieces. These ones are straight out of the pattern (S3752), and measure 29" x 4" before hemming.
You can add these to any dress or apron, making them longer or shorter as you please, but do stick with the 4" width, even for a little girl dress, to get the maximum "pretty bow" factor. For a toddler or baby, width should be 3", to keep it in scale.
I put one end of my sash on the selvage edge, because I knew it would be exposed on this particular apron, and I wanted no chance of fraying. Most aprons or dresses would have this end sewn in, so it usually won't matter.

Narrow hem one long edge of each sash piece, making sure to do opposite edges if that matters to your construction or print. (It does on mine, because of the one selvage edge I want to end up at the sewn-in end.)
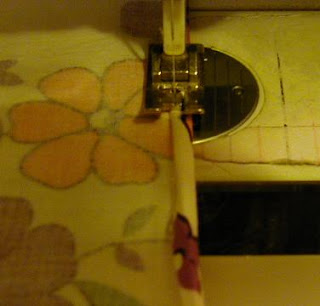
You do a narrow hem by folding over about 1/8" along the edge, fold over again, and stitch near this fold. No need to press before sewing - just finger-crease the folds on the starting end, then fold and crease as you sew. If you're a perfectionist, or just worried about it coming out even, you can press a 1/4" fold along your hem edge, and tuck it back under itself as you sew. (I also have a special foot for my machine, for doing a narrow hem, which I didn't use here because this wasn't a terribly long piece to work with.)

On one end of each sash, fold over the short edge, right sides together, to meet the long, unhemmed edge,
and sew a 1/4" seam, all the way to the point.

Make sure you've done it in the opposite direction on the other sash.

Trim your corner,
turn right-sides out, and press the points so they're nice and smooth.
Check to be sure you've done mirror images with your sashes, because now it starts to matter that you've got one of each.

Narrow hem the remaining long edge of each sash, stitching across the folded-over end as well.

Press the rest of the sash now, if you didn't press the whole length already. It'll be easiest to press it now, before it's pleated and put into a waist.

Pleat the remaining short ends in one large pleat (basically you're folding it in thirds), and pin or baste in place.
Position the sash pieces so that the longest edge is towards the top, and the open side of your pleat is to the bottom (re-pleat if necessary).
Now they're read to sew into your waistband (or side seam) of your apron, skirt, dress, or whatever. Simply follow the directions given for sewing in the boring "tie", adjusting your pleated end if needed to fit the space. If you're adding the sash to a dress that didn't have one, locate the the "natural waist" (usually marked on the pattern pieces) and insert the sash ends in the side seam at this point. When adding a sash to a little girls dress, double stitch the seam for extra security.

For this apron, there is no waistband, so I top-stitched them onto the sides at the top of the apron.

And that's it! You now have a pretty little sash on your apron, skirt, or dress, instead of boring flat "ties".


Having trouble tying your bow? Come back tomorrow, and I'll show you the secret for tying the perfect bow.  After looking around a bit, there are a fair number of good instructions for tying a perfect bow out on the interwebs already, so instead, let me lead you to my favorite. The illustrations are very good, and it is basically what I do, so you couldn't get better than that without a video. You may have to tweak a little to get the ends to work just-so, but that's the easy part. I start a little to my right when I tie a sash that's attached to something, to help the ends come out even. You'll be able to get it with practice.

Monday, April 18, 2011

All My Chickens, Week 12, Fabric Eggs

Because we've got Easter coming up quick, I figure it's time for another egg-related Chicken craft.

There are a lot of fabric egg patterns and tutorials out there, but Stuffed Eggies from Olive Juice & Co is the one I felt captured the shape best. Feel free to make them more realistic in color. I'm probably making mine as wild as possible.

*pic of my own creations added after-the-fact*

Saturday, April 16, 2011

Chic Chicks Read


It took me all week to remember to print. Then, I couldn't find any of my numerous Xacto blades. Not even one. Finally, I had to make do with a larger one that we generally use for DIY stuff. But hey, if the blade is sharp, one razor blade is the same as another, right?

A little tip on printing if you're doing the single color options: download the colors you want, save-as to somewhere you'll remember, then select "combine" on one of them, and add the other files. This will enable you to print two or more to a page, selecting "multiple pages per sheet" and either 2 or 4 (6 is pretty small, but if you like it, go for it). Printing 2 to a page results in a bookmark slightly larger than those on the all-colors page, 4 to a page comes out about 3/4 the size of the all-color page.
You only get Black in the singles, so if you want that, but don't want to waste the rest of the page, combining the files is a great option.
Printing out the "single" colors also gives you the option to present a fellow crafter with a little DIY gift:
Trim down the single, slip it into a card or whatever, and the recipient gets the bookmark, plus all the info on how to cut it out, and where to get more.

What a nifty little Happy Easter present!

*all-colors page=2 1/2" tall, 2 to a page=2 5/8", 4 to a page=1 7/8"

Friday, April 15, 2011

Runs With Chickens Table Runner

Ha! I did it - turned another UFO into a real-world, functioning, useful item!

I spent my FabFibers time Thursday evening hand-stitching the binding to this table runner, just so I could be done with it.
The dark fabric actually has some gold flecks in it, which I think adds a little extra something here.
I considered doing outlines of chickens in the center square, just because, but I'm leaving it for now. I've got other projects that want my attention.

My binding is from the same material as my backing. I actually intended to cut the backing big enough so I could just wrap it around to the front as a sort of mock binding, but I goofed. Wide enough to back it, just not wide enough to wrap to the front when I was done. So I cut bias and pieced that together for the binding.

I do my binding the way I learned from the folks at Little Quilts. You cut a 1 1/2" strip, bias or cross-grain, fold it in half, sew the raw edges to the front of the quilt using a 1/4" seam, and then wrap the folded edge around to the back and hand-stitch in place. It makes for a nice double-layered sturdy binding. There are some similar instructions here.

Thursday, April 14, 2011

finally finished: car socks

I've had this pair of socks I worked on only in the car - stuck in traffic, long red light - I knitted. I was fine with them not getting done super-fast, because it was also something to do when you otherwise would be doing nothing, right?
Recently, I became aware that I needed to free up a set of size 1 needles, so I could start on a pair of socks for Twin2 (Twin1 has yet to approve of the yarn and pattern choices for his pair), and the car socks were the pair closest to completion, needing only an inch or so before decreasing for the toe.
Last night, I pulled them from the car, knowing I'd now have to find another car-appropriate project to replace them with, and I finished them up while watching some old movies.

Today, I proudly wore them to work.
That's a first - wearing my handmade socks to work, on a weekday, with office attire. I just really wanted to, for some reason.

Blame it on Booth. That's what I'm going with.

Yarn: Serenity Sock Weight in Indigo. Pattern is Sugar Maple from 2-at-a-time Socks.

Tuesday, April 12, 2011

Fruit Salad

As part of the weekly challenge over at Sew Weekly (premise=sew a garment every week - seriously!) I took the time to finally finish up yet another UFO - my Fruit Salad Apron, made from S3752. (Colors are much brighter in person - it was extra sunny.)
This is by no means my first apron, but it is one of the very few aprons I've made that I've actually kept for myself. I think aprons make great gifts, so there are a fair few adorable aprons I've made in months and years past that have gone immediately into a gift bag, never to be seen by my eyes again.
Keeping one for myself is a rarity.
From the start, this apron was meant for me, and I chose the fruity prints carefully.
In fact, there are some extra pieces cut for this, because I changed my mind on one of them after finding the pretty lemon print. So I guess that means I'll have to make up another, at some point, using the apple print which is already cut into ruffle and sash pieces.
Speaking of the sash, I finished it differently than shown on the pattern. I knew I wanted something more like a pretty sash, and this has you finish it with plain ties. Having owned and used vintage aprons sporting this more feminine bow option, I knew I could make this look, using the same pieces provided. Instead of sewing the pieces as directed (folded in half, sewn together, for double-thickness flat tie), hem one long edge with a narrow hem (similar to the narrow hems used on the ruffles), fold over one short end, on the diagonal, and stitch to make a point, trim corner and turn right-sides out, then hem the other long edge. Pleat the ends that go into the waistband, (or gather, but most of my vintage aprons have a deep pleat) and there you have it - a flirty, more feminine finish to the apron.
(If I had taken pics of this process, it'd be easier to understand. I can do a tutorial if anyone is interested.)

Monday, April 11, 2011

All My Chickens, Week 11, Chick Chic bookmark

Did you know? It's National Library Week this week!

A bookmark seemed the obvious choice.
While you're there, be sure to check out all the other adorable printables by Jinjerup, including her Easter Owls.
Oh. My. Goodness!

*pic of my own bookmarks added after-the-fact*

Saturday, April 9, 2011

What's going on?

I've been rather silent of late, here on the blog. That's because I've been super-busy elsewhere. Working, mostly, but also creating.
As we get closer to the tax deadline, things at work get a bit more intense, which means I have to work even harder to balance all that number-crunching with something a little more artistic.


Like hand-quilting my chicken table runner (left) or knitting a bulldog (center).

That's right, I said knitting a bulldog. My SIL got me this super-cute book called Knit Your Own Dog, and my grand-niece begged me to make her the English Bulldog. I couldn't resist. Even if the child hadn't been so darn appealing in the way she asked me, the cuteness of the patterns would have done me in anyway. I've got the legs, and one side of the body done so far.
So seriously cute. I think I want to make the Afghan Hound next. Or maybe the Old English Sheepdog. Or maybe the Poodle.
No, wait, the Scotty dog!

In the meantime, I also cast on for another cowl (on the right), this time in a lovely mix called Purple Jewel Heather. (Yarn is Cascade 220 Heathers, color 7811, pattern is a test knit for another MMMar'11 participant.) Had to cast on twice before I got the count right. It's hard to count to 220 (purely coincidental number) while listening to Wait Wait Don't Tell Me (they slammed wool again today - for shame!). I counted it twice before starting on the first round, came up both times with 13 extra, took the extra off the needles, and started counting as I stitched. I came up with 10 extra, didn't believe myself, did another round, and came up with the same 10 extra. Counted again, this time without knitting, and still had the 10 extra, so I had to believe it. Frogged the whole thing and started over, this time putting stitch markers on after every 20 cast on stitches, double checking to be sure I really had 20 in each section. Counted again as I knit the first round, and this time, thank heavens, came up with the right number. Not all a waste of time, though, since my second cast-on was much smoother and more even in tension than the first had been.

Boy, it's a good thing I've got something creative like knitting to get me away from all these numbers....

Wednesday, April 6, 2011

A Little Fancy for the Kitchen

I recently completed this cute set of knitted dishcloths, complete with matching (purchased) dishtowels.

This project was years in the making because of one tiny problem: I couldn't find any cotton yarn in Fall colors.
For years, I searched high and low, to no avail. After a while, I was willing to step outside the traditional, look for anything that might suggest any color of leaf, in any stage besides fresh green. I'd be happy with shaded browns. I even considered going with a "candy corn" look. Nada. When I finally did find some, all they had was an enormous 1lb cone. I didn't even think twice, though - I bought it.

Then it sat a while. The animosity it had absorbed over the years put me off, I think.

Luckily, the intended recipients birthday rolled around again, I was reminded with time to spare (you'd think I could keep track of these things on my own), and the project came out of hibernation.
I couldn't find or remember what pattern I'd been using, so I had to decipher it by looking at another, but that wasn't too difficult. (Only after I'd given them did I recall why the ball bands were still tucked in with the rest of the project - on the reverse was the pattern.)
At the last minute, I decided these deserved a better presentation than just being folded in neat rectangles and stuffed into a gift bag. I fan-folded them together, tied each set with a bit of curling ribbon, found a larger gift bag, and stacked them gently in seasonal order, Spring on top. Lovely!
On the off-chance that you're thinking this is a great idea, I suggest that you find the right colors of yarn first, then look for dishtowels that will coordinate. I must have swapped out dozens of "Spring" and "Fall" colored dishtowels before being satisfied with how it looked. Christmas and Americana colorways are generally available, as are various pastel combinations for Spring. I would have liked something more generically Summer, like a nice bright yellow/red/blue combo, but it wasn't out there. If you need a good fall yarn, this one is Peaches & Creme in Shaded Browns, finally discovered at WalMart. You're welcome to have some of mine, though, as I've got enough to knit dishcloths for half of Provo.

Tuesday, April 5, 2011

It was a Frame-up

The little patchwork chicken worked up pretty quickly, once I chose the fabrics.
That's always the longest part of the process for me - fabric selection. You'd think that'd be easy, but there are limited choices out there, and what you have in your head isn't necessarily what you'll be able to find.
I love how this looks, but I really wanted to find something with the green, blue, and pink/purple colors, from the lower body fabric, to use for the beak and part of the comb. I just didn't have anything with those colors that didn't also have something that didn't coordinate. I tried out about 6 different fabrics before settling on the dark brown floral I used, and it was so hard not to go out shopping in search of something "better".

I think this is why I like kits. They gather all the fabrics for you, and all you have to do is put them together.

Anywho...
easy pattern, though the directions for cutting are a little vague.
Fabric 1 (body) is really 2 different fabrics,
Fabric 2 (tail, comb, beak) is really an assortment of 3-4 fabrics,
Fabrics 3-6 (background) are all the same fabric, different cuts.
The picture is more helpful than what's written, but it would be nice if the directions were explained a little better.

When I cut my background fabric, I went ahead and cut the 1 1/2" strip from the full width of the fabric (that's a strip size I often use anyway), so I had plenty of extra for borders. I hadn't yet decided how I was going to finish the block when I realized that if I added a border from 1 1/2" strips, it would fit in an 8 x 10 frame. I thought that sounded like a good idea.
To do this, you need four 1 1/2" x 8 1/2" strips (total 25 1/2").
Sew the strips to the right and left sides of the chicken first, then to the top and bottom.
This will give you just enough to fold to the back of a piece of cardboard cut to fit your frame. Tape it in place (I used masking tape) and put it in the frame.

Of course, this would be really cute made up into a pillow, or as part of a larger quilt, both of which I could still do, should I change my mind. I'm happy with it the way it is for now.

Monday, April 4, 2011

All My Chickens, Week 10, Quilted Table Topper

This is one of those weeks where I try to finish up a project I already started.

I've made one of these already, in patriotic fabrics, then started another, featuring a cute chicken print:

and cut out yet another in these pretty fabrics:

Do this one in whatever fabrics you like, of course, but the one I'll be finishing this week has a decided chicken theme to it.

You'll need 3 fat quarters, 1/2 yard of another fabric for the backing, and a piece of batting about 18" x 45".
You'll also need 92" of 1 1/2" bias binding, which you may be able to piece from the leftovers, or you can use prepackaged bias, or cut from another fabric.

I have a few corrections to the pattern, discovered while making my first one:

Even though the directions say you'll be cutting 21" long strips, there is no need to cut your fat quarter to exactly this length before cutting the strips. Just make sure it's at least that long in one direction. Usually they will be just a bit longer. If it's a little shy of 21", you'll be okay - you only need about 19" of it.

You only need to cut three 2" x 21" strips from each fat quarter (directions say four, but you don't use the last one, so don't bother. you do still cut the 9 1/2" x 21" strip, of course).
In fact, you only need two 2" x 21" strips of the color you've chosen for the center square (referred to as "white" in the directions). If you're stacking the fabrics to cut all at once with the rotary cutter, stack this one on top, and peel it off before cutting the third strip for the other two. If you like getting the most out of your fabrics, the way I do, you don't want a bunch of unnecessary cuts laying about.

The "inventory" should include everything listed except the two 12" x 2" strips of "white" (center color), as you just used those to complete the two-part strips with the other two colors.

The directions from there are fine (though there are a few typos).

When I cut off the triangles from the edges (last step before quilting) I found that not all my strips lined up exactly. If it was within the 1/4" seam allowance, I let it be a little short, and just watched carefully that I caught all the edges when I stitched on the binding. If yours are a little uneven, just do the best you can.

If you will be using a directional print like mine shown above, make sure the length of the strip goes in the direction you want, even if that means rotating your fat quarter and cutting an extra strip or two to get the pieces you need. I felt my chickens needed to be marching the length of each strip rather than the width.
Be careful when you sew on the strips that they are all facing the same direction. I chose to put their heads towards the center square, which means the ones on the other end are upside-down, making it symmetrical.