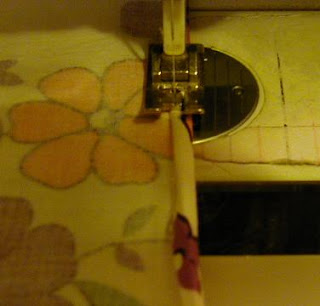
(Excuse the light-quality, please. It was night, and I turned on every light I could think of in my sewing room, but there's still some yellowing and a few shadows. Sometimes the lack of a flash is a good thing, other times, not so much.)
First, you'll need to cut your sash pieces. These ones are straight out of the pattern (S3752), and measure 29" x 4" before hemming.
You can add these to any dress or apron, making them longer or shorter as you please, but do stick with the 4" width, even for a little girl dress, to get the maximum "pretty bow" factor. For a toddler or baby, width should be 3", to keep it in scale.
I put one end of my sash on the selvage edge, because I knew it would be exposed on this particular apron, and I wanted no chance of fraying. Most aprons or dresses would have this end sewn in, so it usually won't matter.
Narrow hem one long edge of each sash piece, making sure to do opposite edges if that matters to your construction or print. (It does on mine, because of the one selvage edge I want to end up at the sewn-in end.)
You do a narrow hem by folding over about 1/8" along the edge, fold over again, and stitch near this fold. No need to press before sewing - just finger-crease the folds on the starting end, then fold and crease as you sew. If you're a perfectionist, or just worried about it coming out even, you can press a 1/4" fold along your hem edge, and tuck it back under itself as you sew. (I also have a special foot for my machine, for doing a narrow hem, which I didn't use here because this wasn't a terribly long piece to work with.)
On one end of each sash, fold over the short edge, right sides together, to meet the long, unhemmed edge,
and sew a 1/4" seam, all the way to the point.
Make sure you've done it in the opposite direction on the other sash.
Trim your corner,
turn right-sides out, and press the points so they're nice and smooth.
Check to be sure you've done mirror images with your sashes, because now it starts to matter that you've got one of each.
Narrow hem the remaining long edge of each sash, stitching across the folded-over end as well.
Press the rest of the sash now, if you didn't press the whole length already. It'll be easiest to press it now, before it's pleated and put into a waist.
Pleat the remaining short ends in one large pleat (basically you're folding it in thirds), and pin or baste in place.
Position the sash pieces so that the longest edge is towards the top, and the open side of your pleat is to the bottom (re-pleat if necessary).
Now they're read to sew into your waistband (or side seam) of your apron, skirt, dress, or whatever. Simply follow the directions given for sewing in the boring "tie", adjusting your pleated end if needed to fit the space. If you're adding the sash to a dress that didn't have one, locate the the "natural waist" (usually marked on the pattern pieces) and insert the sash ends in the side seam at this point. When adding a sash to a little girls dress, double stitch the seam for extra security.
For this apron, there is no waistband, so I top-stitched them onto the sides at the top of the apron.
And that's it! You now have a pretty little sash on your apron, skirt, or dress, instead of boring flat "ties".


1 comment:
Thank you for this little tute on sashes. I want to add one to a child's dress I am making, and seems to be a good way.
Elaine
Post a Comment