Great instructions for an origami hen with an egg that comes out.
I know, it's a little silly. But maybe I can make some for the tree?
Sort of still distracted, and working a lot, and I just can't seem to come up with anything better at the moment. I need simple.
Showing posts with label paper. Show all posts
Showing posts with label paper. Show all posts
Monday, December 5, 2011
Wednesday, July 13, 2011
Rooster #1 finally finished

I didn't forget about it. I just had trouble with the finishing.
I wanted to either sandwich it between two panes of glass, or put it on a black background. Both options turned out to be more involved than you'd think, so there it sat, unframed.
I finally just decided to go with "good enough" and get it framed and on the wall, in whatever way I was able. If I find that "just right" piece of black paper, or another sort of frame that seems to want to be used with only glass, I might change things. (The frame I got, the things that hold the back in place were attached to the backing, so I would have had to get all kinds of clever to figure out how to keep everything in place without them. I wasn't up to it.)
IF I ever update it, I'll be sure and put it out here for you to see. In the meantime, I think it'll do.
Tuesday, June 7, 2011
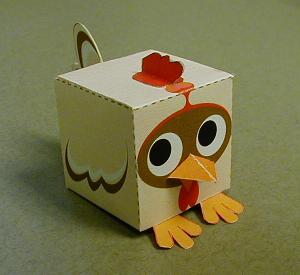
Cutie Patootie Paper Box Chicken
I don't know why, but this boxy little chicken makes me grin!
Now I just need some boxy baby chicks to go with it!
I used some basic cardstock, from the scrap-booking section of JoAnn's. Nothing special, just white cardstock. I used scissors to cut out, no Xacto could be found for some reason anyway. Gluestick where it was needed. That's all.
I printed the cow and pig as well, but haven't yet cut them out.
AND - just found the original site that these came from! Lots and lots more boxy (and not-so-boxy) friends to make at Paper Box World.
Could be that cute expression on her face. Could be how easy it was to make. Either way, super cute, don't you think?
I used some basic cardstock, from the scrap-booking section of JoAnn's. Nothing special, just white cardstock. I used scissors to cut out, no Xacto could be found for some reason anyway. Gluestick where it was needed. That's all.
I printed the cow and pig as well, but haven't yet cut them out.
AND - just found the original site that these came from! Lots and lots more boxy (and not-so-boxy) friends to make at Paper Box World.
Tuesday, May 31, 2011
All My Chickens, week 18, fun with paper!
Mkay, these are super-simple and cute, and have nothing whatever to do with Memorial Day, except that if you are as exhausted from this past weekend as I am, simple is a really good idea.

From Paper Modelz, Cute Farm Animal paper craft. I got lost for about an hour when I found this site. So many seriously cute things to make with paper, all of them ready to print so you can just cut, fold, glue, and there you have it. Super Cute.
*pic of my own creation added after-the-fact*
Thursday, May 26, 2011
The Printed Chicken
(almost sounds like a good name for a shop...almost)
 This was, as I said before, a total no-brainer, easy project. As long as it really did come out the right size to fit in a standard frame, which, thank heavens, it did.
I was going to go for something plainer, but this barnwood beauty called out to me from my massive collection of why-did-I-buy-that frames I have tucked away under the window seat.
I could have been happier if I'd cut it outside the picture on the bottom edge there, and chopped a little off the top, but this'll do.
Monday, May 23, 2011
All My Chickens, Week 17, wishing for something Queenly
I really really really wanted to find us something in the way of a Queen Victoria sort of chicken to celebrate Victoria Day this week. Sadly, I was only able to find recipes for something called Chicken Victoria, which I just couldn't get excited about. (I'm sure it's delicious, it's just that I've got some big projects going, and something "new" for dinner isn't going to work right now.)
The idea came to me when I spied this traditional picture of the Queen, in which I quite clearly see a broodie hen:

The idea came to me when I spied this traditional picture of the Queen, in which I quite clearly see a broodie hen:
(from here)
See what I mean?
Anyway, for lack of anything more appropriate to the week in question, I bring you, instead, an easy print-and-frame project.
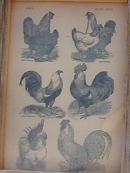
From the Graphics Fairy, a lovely encyclopedia page from 1888 (which was, at least, during her lifetime), featuring chickens.
When I clicked it, I got a printout that would just need a little trimming to fit a 5X7 frame, with no loss of actual chicken graphic. You could get more creative, and decoupage this onto something, or print it on fabric and sew it up. I'm just going for simple myself.
*pic of my own project added after-the-fact*
Saturday, April 16, 2011
Chic Chicks Read

I love these bookmarks!
A little tip on printing if you're doing the single color options: download the colors you want, save-as to somewhere you'll remember, then select "combine" on one of them, and add the other files. This will enable you to print two or more to a page, selecting "multiple pages per sheet" and either 2 or 4 (6 is pretty small, but if you like it, go for it). Printing 2 to a page results in a bookmark slightly larger than those on the all-colors page, 4 to a page comes out about 3/4 the size of the all-color page.

You only get Black in the singles, so if you want that, but don't want to waste the rest of the page, combining the files is a great option.
Printing out the "single" colors also gives you the option to present a fellow crafter with a little DIY gift:
Trim down the single, slip it into a card or whatever, and the recipient gets the bookmark, plus all the info on how to cut it out, and where to get more.
What a nifty little Happy Easter present!
Monday, April 11, 2011
All My Chickens, Week 11, Chick Chic bookmark
Did you know? It's National Library Week this week!
A bookmark seemed the obvious choice.

While you're there, be sure to check out all the other adorable printables by Jinjerup, including her Easter Owls.
Oh. My. Goodness!
Oh. My. Goodness!
*pic of my own bookmarks added after-the-fact*
Tuesday, February 15, 2011
Project Progress
I've not blogged much about some of my recent projects, but I've got plenty in progress at the moment.
I mean, there are always lots of UFO's at my place, but I wanted to throw out some pics of my progress on a few that are actually still considered current, as opposed to being tucked away, awaiting renewed interest.
I mean, there are always lots of UFO's at my place, but I wanted to throw out some pics of my progress on a few that are actually still considered current, as opposed to being tucked away, awaiting renewed interest.

My DK baby boy blues are coming along nicely. I did my short row heels, and I'm on to the leg of the sock. I notice my short-row wraps are not as snug as I might like, but in the interest of not going nuts with the DK stuff, I'm letting them stand. My next pair will be much better, I'm sure.

As for the two All My Chickens projects I should have already finished, I've hit a little snag with the first one. I finally got the whole thing cut, and it's lovely, but I failed to consider that if you have something that goes nearly to the edges of an 8 1/2" x 11" piece of paper, you will not be able to then frame the finished item in an 8" x 10" frame.

Duh.
Apparently, I didn't run to 11" x 14" in my past history of frame-buying, so I've now got to go on a frame hunt. I feel a bit stupid about that, as it would have been very easy to shrink the pattern down just a smidgen. I like how it looks, though, so the framing expedition should be worthwhile, when I can finally find the time.(The second one, I hope to be showing off soon. I think. So no spoilers yet.)
I managed to finish Twin2's PJ top that matches the bottoms sewn for Christmas 2008. He hasn't worn it yet, but I expect he will. Either way, it's no longer in the sewing room, so that's something.
I pulled out another long-time UFO (cut out sometime in the 90's, but not a stitch sewn until now), and I've made some reasonable progress there. It's a knee-length jumper (meaning a sleeveless dress with deep armholes, not a pullover sweater, though I have had some of those in knee-length, too (it was an 80's thing)) cut out in a lovely deep mustard/gold colored wide wale corduroy. Not even sure corduroy comes in such a bulky wide wale anymore. It was popular at the time. Construction was initially delayed by the need to find a matching lighter-weight fabric to make the facings, as the corduroy itself was far too bulky to behave well in that capacity. As the well-matched cotton was neatly tucked away with the rest of it, I have no clue why I ignored it this long. I suspect that I may find it's desperately out of style, and may not get worn once it's done, but I still feel a need to finish it. I remember I was pretty excited about it at the time, so who knows.
I also finally finished a sweet little pink owlie sleep sack. I want to make the matching hat, so I guess the project as a whole is not actually complete. However, were I to receive a last-minute baby shower invite, I'd be okay with giving just the sleep sack without the hat, if I had to.
That's all for now, progress-wise. I have several other things I wish I could say I'd made progress on, but as they're all just exactly as they were back in January, this is all I can brag on today.
Monday, January 31, 2011
All My Chickens, week 1, Papercut Rooster
I've often admired the elaborate paper-cuts, traditionally done in red paper, that I understand are to be hung in the window during the celebrations for Chinese New Year. Somewhere, I've got a little envelope with a collection of all the animals, all very intricate, and fairly delicate, which I intend to frame one day so I can enjoy them all the time.
While trolling the web for chicken-related projects that might relate to either Groundhog Day (wasn't sure how I'd tie that in, but I was trying to keep an open mind) or Chinese New Year, as those are the holidays celebrated this week, I was thrilled to find a satisfactory paper-cut of a Rooster.
![]() (Yes, I'm fully aware this is to be the year of the Rabbit - but I'm doing a Chicken theme, and Rooster is a long way off.)
(Yes, I'm fully aware this is to be the year of the Rabbit - but I'm doing a Chicken theme, and Rooster is a long way off.)
I haven't yet found a red paper worthy of this pretty design, but as this is my first try in a long time at such delicate paper cutting, I may just work with what I've got handy before I snip into something more expensive. Not that one piece of paper could set you back too much, but I know I'd feel it was a shame to ruin it, should I botch this one up.
The idea is to cut out the white portions of the design, leaving the dark portions intact. I realize that the Rooster then is totally separated from the cloud-like and grassy pieces, but as I plan to mount this piece in a frame (I'm thinking between two panes of glass instead of on a background) I think I can make it work.
Though you probably don't need to go out an buy a fancy pair of scissors (Scherenschnitte was mildly popular in my teens, and required the use of small, very pointy, very sharp scissors, which of course I've totally lost track of), what you use does need a good sharp tip. Or, I suppose, you could use an Exacto, (on a cutting mat) if you're handy with one.
And in case this project makes you want to bust out all the colorful paper and get your kids involved, there are lots of simple, cute designs (one possibility here) that any kid old enough to handle a pair of scissors could manage, too.
*pic of my own creation added after-the-fact*
While trolling the web for chicken-related projects that might relate to either Groundhog Day (wasn't sure how I'd tie that in, but I was trying to keep an open mind) or Chinese New Year, as those are the holidays celebrated this week, I was thrilled to find a satisfactory paper-cut of a Rooster.

I haven't yet found a red paper worthy of this pretty design, but as this is my first try in a long time at such delicate paper cutting, I may just work with what I've got handy before I snip into something more expensive. Not that one piece of paper could set you back too much, but I know I'd feel it was a shame to ruin it, should I botch this one up.
The idea is to cut out the white portions of the design, leaving the dark portions intact. I realize that the Rooster then is totally separated from the cloud-like and grassy pieces, but as I plan to mount this piece in a frame (I'm thinking between two panes of glass instead of on a background) I think I can make it work.
Though you probably don't need to go out an buy a fancy pair of scissors (Scherenschnitte was mildly popular in my teens, and required the use of small, very pointy, very sharp scissors, which of course I've totally lost track of), what you use does need a good sharp tip. Or, I suppose, you could use an Exacto, (on a cutting mat) if you're handy with one.
And in case this project makes you want to bust out all the colorful paper and get your kids involved, there are lots of simple, cute designs (one possibility here) that any kid old enough to handle a pair of scissors could manage, too.
*pic of my own creation added after-the-fact*
Subscribe to:
Posts (Atom)


