Showing posts with label sewing. Show all posts

Wednesday, July 1, 2015

Chicken Strips (forever)

how long should it take to finish a mini-quilt? weeks? months? years?


I just couldn't seem to get that quilting done, until I made myself pick it up, again and again.
Then, it just sat there, needing binding, until one night, after finishing another project, I had a few more minutes of whatever I was binge-watching on Netflix from the sewing room, and I sewed on the binding, ready to hand-stitch the opposite edge when I felt so inspired.

which did, eventually, happen. so, here it is, after way too long in process, the chicken strip mini quilt. Fin.

(what week was that? I have no clue. not that it matters.)

Wednesday, August 14, 2013

sheer caramel

You know that blouse I was telling you about in the last post? The one I said I got excited about wearing every time I thought about it?
Here it is!
(excuse the terrible lighting, please. my photo-taking ops are limited)

See, I really did get right back in that sewing room and work on it, just like I said I would.

I LOVE IT!

It took ages, because there was a lot of hand sewing involved - on the placket, the cuffs, the collar. Normally, when the blouse fabric isn't sheer, the reverse sides of cuffs and the like don't get such a clean finish. I usually just sew the band on as one piece, and serge off the edge. Structurally sound, and nobody sees it. But this, I had to fold under and stitch in place, to maintain the look of the sheer fabric banded by satin.
The satin is heavy enough that I could have done without the interfacing, I think.

Sadly, I already had to mend this. The left side seam shredded itself at some point during the day, and I ran right home and patched it up. This sheer fabric can be delicate sometimes.
(I say "patched" because that's what I actually did - used a scrap of the fabric to patch over the frayed section, and then sewed that into the side seam. Really the best idea when you have a fabric that tends to fray, because sewing it back up, which generally means your seam is deeper than before, therefore making your blouse slightly smaller, it's just gonna rip itself out again.)

Pattern is NL6621 (discontinued)

 
I think this will require hand-washing. Not a huge deal, but it might mean I wear this less often.
 
Also, I think I need some reddish-pink pants to wear with it. The beige look okay, if a little boring. I went out looking for fabric, but so far, nothing that's just the right color, except some faux-suede, which seems totally wrong, since this blouse weighs practically nothing. (The collar weighs more than all the rest of it put together.)
 
It's perfect for the hot weather we've been having this summer. And I feel like it's a flattering silhouette for me.
 
I have plans to use this sleeve on another blouse, so I was doubly motivated to get this done. I needed to know if I really do like this sleeve before subbing it in.

Monday, July 29, 2013

I Sewed Something! For Me!


It's been an age since I last sat down in my sewing room to do anything but alter or mend.
Or, at least, it feels that way. It's been hot, is my latest excuse. I don't have central air at home, so I tend to retreat to my much cooler, oh-so-inviting basement rooms right-quick after work.

Anyway, Thursday night, for some reason, I felt I could brave the heat and sew for a few hours. (Note to self: move sewing room downstairs.) Earlier in the day, I'd been in there to do a quick mend before work, and as I idly noted to myself that I still had blue thread on the serger (from an alteration), I felt I'd best think about what blue things I might have in my queue*. I pulled out a sheer knit top I'd cut out way back when, and propped it up on my machine, to remind me.

(I'd actually been more excited to sew up this sort of caramel colored sheer blouse I finally cut out last weekend**, but I was trying to be practical, use the serger as-is, instead of changing the thread.)

So, instead of settling in to watch some Netflix in the cool of my basement family room, I trudged back up the stairs and sat myself down in front of the sewing machine. I thought I'd go mad if I had to change the needle, so I left it. It seems to have worked out okay.

I reminded myself to check the fit of everything before I serged off the seam allowance. Had to let out the sleeves a bit, for my less-than-slender upper arms. Other than that, this is as the pattern was printed.

I'm pretty pleased with myself.

I was sort of using up fabric, and testing the pattern, seeing if I liked the look of it; but also, I liked the idea of this fabric in this sort of shape.

I think the bustline is fairly flattering, so, I think it'll be worth making for myself again, in some other fabric.
Fabric was purchased too long ago to remember where. Pattern is Butterick 5185, which is out of print now. (Sometimes, it just takes me a while to make something...)
It must be noted that the "knot" and the "waistline" are really much more empire than shown on the pattern. This means that the slit is above the waist, so even non-sheer fabrics might need an undershirt. (Too bad my photos don't show the hemline. I was doing a selfie using the timer, and there are only so many places I can take pictures without a tripod, so, this was as much of the top as I could get.)

*When I figure out what I want to make, I put it all in a gallon Ziploc, pattern, fabric, buttons, etc. so it's all together. When I cut it out, I put it all back in the baggie so I can keep it clean and together until I sew it up. I have a healthy stash of these little "kits" near my sewing machine, so I can sew whenever the mood strikes. 

**Every time I thought about that blouse, and the fabrics, and how they were going to look together, and the buttons I'd picked out, I got all excited and wanted it sewn up already. It wasn't even cut out, but still I got excited - so I finally forced myself to cut it out, which took forever because it was all sheer and/or slippery fabrics. It's my next sewing project, I swear, and it's gonna be awesome!

Thursday, January 3, 2013

Christmas Stockings

I had a dilemma. I didn't want to send my missionary son his same Christmas stocking that he grew up with (what if he lost it? left it behind?) and I also didn't want to get him one of those basic red & white numbers from the dollar store (huge, and, kinda dumb, really). Not to mention, what is he supposed to do with it between now and next Christmas? Or would I have to come up with another one next year? What to do? I mulled it over for quite a while. Days, in fact. I was coming up on the day I had to mail his package, and I still had nothing.

And then, it hit me. I was planning on making him some fleece socks anyway, and I realized that I could put a fur cuff on the top, with a hanging loop, and just make it so he could remove these when Christmas was over.

I used black fleece (he's not much for color) and sewed up the socks as usual. (I use a pattern from Green Pepper, 527, which has all the sizes, child to adult. It says slippers, but I make them without folding down the cuff - I just leave it.)

I then took some strips of white fleece/fur (very silky, soft - no idea where or when I got it), about 4" wide and about 1/2" longer than the circumference of the top of the socks. Sewed the short ends together, rights sides facing, then folded it over the long way, wrong sides together, and sewed all around, making this into a cuff. I had some leftover pieces from his PJ top, in black knit, which I cut into skinny strips (about 1" wide) and pulled them to make them roll up into strings, to use for hanging loops. Sewed that onto the inside of the cuff, making sure it was totally secure.

Once I had the cuffs ready, I put my sewing machine on the longest basting stitch, and sewed them onto the tops of the stockings. Easy to remove the stitching later, so they could be socks, but in the meantime, they'd make a cute Christmas stocking.


I put in instructions for him, on how to remove the cuffs, and filled up both stockings with the usual Christmas stocking contents. (Doing the cuff on just one didn't seem right.)

After I'd mailed everything off, and was showing off the pictures and telling everyone how creative I was, it occurred to me that my boy was just the sort of kid to wear them as-is, without taking off the furry cuff.

Turns out, I was right.

Wednesday, December 5, 2012

Christmas PJ's

Know what? I just figured out how come it's okay for some stores to have their Christmas stuff out on the shelves a couple months early. It's for those of us that have a relative/loved one far from home. I mean, how can we give, say, our missionary son, a piece of home, if those particular Christmas tradition-type items aren't in the stores when it's time to send our packages? So, in a way, I'm grateful you can buy candy canes and chocolate oranges in October.

My boy isn't overseas, but I still had to ship his package out before December had hardly begun. This meant I had to get busy and get his usual Christmas pajamas sewn up.

I had the fabric. I had measurements (taken before he left). I just needed to make the time to get them cut out and sewn. When I finally forced myself to get it all out, I discovered the fabric was just a smidge shorter than what I needed for his tall self. I mulled it over, and finally decided I'd add a strip of plain black flannel to the bottoms of each leg instead of hemming them. It works.

For the top, I dug up some random remnants of black knit, and more of white knit, and figured out which pieces would work. I ended up cutting the sleeves (in white) on the cross-grain, again due to a shortage of fabric length. Lucky for me, both knits I used were 2-way stretch.

I like how the whole thing came together, in the end. I sure hope he's happy with them, too.

(He'd better be! I even gave him pockets this year! I almost never do pockets.)

Tuesday, June 12, 2012

out of season

I've been in my sewing room a bit lately. First, to sew up PJ's for my boy, and then later, his robe. (Neither of which were photographed before being sent off. Bummer.) At any rate, having to do those projects got me back into the swing of things where sewing was concerned, and I'm so glad.

Last night, while watching a little Netflix and putting blanket binding on the fleece blanket and pillow case for my missionary boy, I found myself with more time left of the show I was watching, and nothing left to do on the project. I could have turned it off, gone to bed, and finished the show on my Kindle Fire, but, there I was, surrounded by unfinished projects, so I stayed.

Floating near the surface of those unfinished projects was a little Halloween pillow cover I'd not quite managed to finish last fall. I'd done all the stitching, and put on the borders, even chosen the backing. Where I got stalled was in how to finish the pillow. I reasoned that it was going to be easier to store a pillow cover than a whole pillow, so I wanted to be able to remove it when the seasons changed. But how best to do that?

My backing piece was slightly longer than it needed to be, so I'd pretty much settled on some sort of overlapped opening in the back, perhaps tied with ribbons. Good idea, and something I'd done before, but I wanted just exactly the right finishing on the outer edge, and the right ribbon to tie it with. Hence the stalling.

While mulling it over last night, my eyes lit on the exact right color of bias binding, and then a bit of ribbon, just a scrap really, that I thought would do.

Twenty minutes later, I had this:
(in retrospect, I think the ribbons should be a bit closer to center)
And I was done!
I know it's totally off-season, and I'll have to put it away until October. But it's finished, it's no longer taking up space in the sewing room, and I have a cute seasonal pillow cover!

The embroidery pattern is something I've made before, for a friend, and then stitched up for myself later. (Can't find it online at the moment, or I'd link to the designer/source - will update if I find it.)

I like to use a travel size pillow insert for decorative pillows like this. Easy to find at just about any fabric store, and very handy.

For the back, my piece happened to be about 3" too long, so I folded it in thirds, creased it, and cut off one third for the top portion. (I could have cut it in half, but I like thirds.) I then serged the upper edge of the bottom portion, just to make it so I didn't have to worry about fraying (it won't be seen), and bound the lower edge of the top portion with double fold extra wide bias tape. I used a sort of peach/coral color that I thought blended nicely with the Halloween colors on the front.

I overlapped the two back pieces, bias-bound edge on top, making the total finished length to match the front piece, and stitched the overlapped portions together at the outer edges.

Then I took the ribbon, a sheer ivory ribbon, about 1 1/2" wide and, at a guess, about a yard long (it was a scrap, likely from a package someone had given me, and I didn't measure it before I cut it up for this project), and cut it into four equal pieces, each piece being cut straight at one end and slanted at the other. I positioned them on the right side of the pillow back, two pieces to be sewn to the underside of the bound edge, the other two sewn just below these, on the lower portion of the backing.

After stitching them in place, I put the backing right sides together with the front, stitched around the whole outer edge using 1/4" seams, clipped my corners, and turned it right side out.

Slip in the pillow, tie the bows, and there you have it. Cute from either side, and ready for fall. Plus, I can use the pillow for other seasonal covers, and I can wash the cover easily - just untie the bows, slip it off, and it's ready.

Now I just need to hunt up a cute patriotic design that fits the pillow dimensions, and get that stitched up in time for the 4th.

Thursday, May 10, 2012

long time

Recently, I was reviewing my lists of finished objects, (I've been feeling a tad unproductive lately), and started to wonder when it was I last sewed something for myself.

Something to wear.

Turns out, it was last August; the brown butterfly print top that I made right before the road trip to Seattle.
That's a long time.

I know what I thought I'd make after that.
I'd started on it, and had to replace a piece due to a hole I made when the serger took over.
But that's long since been fixed, and still the shirt hangs there, next to the sewing machine, no further along than it was then.

I don't know, exactly, why I'm not spending much time at the sewing machine. Surely, I have unfinished objects by the dozen that I could choose from? All cut out, ready to put together? Maybe, it's just that none of them appeal to me lately?

Whatever the reason, I think it's high time I got myself back in there. There has to be something in there that would tickle my fancy, get me back in production mode. Something.

Tuesday, April 10, 2012

All My Chickens, Week 50, Cock-A-Doodle-Make-Do

I ran across this project while sorting old magazines. It's from a 2004 issue of Country Marketplace (which they don't publish anymore, I understand).

Pretty sure I have the right colors of felt on hand to make this one. I like the patriotic look.

Monday, October 24, 2011

All My Chickens, Week 39, Chick-O-Lantern

And, the last of the Halloween Chicken Trio, this one's dressed up like a Jack-O-Lantern.
(these guys are not exactly the quickest things I've ever made up)

Thursday, October 20, 2011

All My Chickens, Week 38, Count Chickula

Another of the trio I started back in on last week.
(I was holding off so I wouldn't have to post this with the same picture, but haven't taken any more yet, and here it is Thursday.)

This week, it's Count Chickula. Hope I get some work done on him soon, or you're going to think I'm all talk and no cluck.

Tuesday, October 11, 2011

All My Chickens, Week 37, Long John Chicken

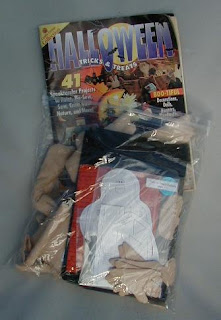
For the next three weeks, I want to focus on a project I got out of a Halloween Tricks & Treats magazine from 1996: three adorable chickens, all dressed up to go Trick-Or-Treating!
The muslin bodies are basically the same, and you just add the appropriate outfit and accessories to make it unique.
Sorry that this isn't something I can link to, but when you see the finished chickens, I think you'll understand why I had to prioritize them and get them done.
You can see from the photo that I've done a little of the work already. And I think I've managed to gather all the necessary materials. I've just got to get this finished!

For lots more Halloween crafts, be sure to check out the BHG Halloween pages. This one either isn't there, or it's buried deep, but there's plenty of fun, quick, and easy ideas for Halloween decorating and more!

Tuesday, October 4, 2011

Henry's Progress

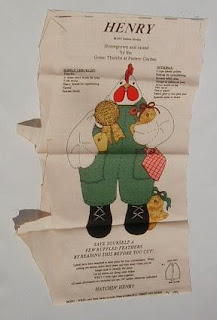
This is how far I've got with Henry:
The beak is all tweaked funny. It's because I decided that instead of lightly stuffing the beak, which didn't make sense in my head, I'd lightly stuff the wattles. Apparently, that wasn't the best idea. Whatever.

Here's the thing: panels seem like a great idea, but what if they print off-grain? or what about having something with a different texture? I think that's my main complaint with panels: lack of texture.

On the plus side, you could, theoretically, trace or copy the pieces before you sew them up, and then you also have a pattern.
Have I ever really done that? Not so much. But I could. Which is what matters, right?

Monday, September 26, 2011

All My Chickens, Week 35, Henry

This is a little printed panel I picked up somewhere along the way when my Twins were little, and I just never got beyond cutting it out.
I want to finish it up, so I can enjoy it's cuteness.
(next week, we'll have his companion, Henrietta)

Wednesday, September 21, 2011

Sort of a Barnyard Bird

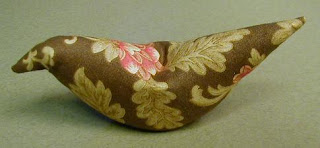
I decided to try one in fabric first, and now I don't know if I need to try the knitted variety right away.

This Barnyard Bird was a simple as can be, and pretty much follows the same instruction as the knitted variety. Take a 5" square of fabric, fold it on the bias, into a triangle, and sew up the sides, leaving an opening to turn. Turn and stuff, then sew up the opening. Take a needle with a length of doubled thread, knot it into the point at the bottom of the chicken, and sew up through the middle of the back, pulling it up to desired shape, then back down to the point. Tie a knot to anchor it. The point will now be up inside the body, making a sort of base for the chick to sit on. Play with the "head" and/or "tail" and sew into place as desired with your needle and thread.

Tuesday, September 20, 2011

We've already missed the Spring...

This simple and cute little Spring Chick Tea Towel came together quickly.
I used my favorite machine applique that looks hand-stitched, the blind hem stitch. This time using ecru thread, since so many of the elements are pastel.

I hand-stitched the eyes and the small bird's legs using 3 strands of orange floss - I just picked something that looked like it coordinated with the fabrics.

I have so many of these tea-towel applique kits in my stash, including at least half a dozen that are already fused onto towels.
I really need to get tough with myself and find a way to get these finished up and out of the sewing room.

Monday, September 19, 2011

All My Chickens, Week 34, Spring Chick

I know, I know, we're just about to enter the Fall season (my favorite!), and here I am bringing up Spring.
I just didn't realize this was in my UFO pile back then. Now that I've found it, I have to get it done, even if it isn't the right timing.

Another of the kits I picked up at some craft fair or other. It's been fused onto the tea towel since who-knows-when, and I should get it stitched on, and then tuck it away to await the Spring.

Tuesday, September 13, 2011

On a Roll

I just keep finishing up stuff. Like these two tea towels.
Fall themed, so a little ahead of schedule, but they were handy when I was hunting up something quick to complete. Both are from kits I picked up at local craft fairs.

I know they're just small things, but I figure anything that leaves (ha!) the sewing room for good still counts as progress.

Monday, September 12, 2011

Did you know...

Sock Monkey socks come in pink?!?

Neither did I, until I saw them in a shop in Seattle.

How cute is that?

Thursday, September 8, 2011

Chicken Wristlet

The humbug bag was so quick and easy, I'm sure it shouldn't be legal.
I used a pre-quilted fabric (Hancocks?) from my stash, and made the smallest size (finished size = 4 1/2" x 5 1/2" - kinda small for a make-up bag, and a little big for spare change, but it would hold your keys, phone, credit cards and the like).

I dunno why it tells you to have a 9" zipper for this size. You stitch it onto the short sides of a 6 1/2" x 9 1/2" rectangle, and I see no need for the extra length. It shows you how to shorten it to fit, but I did all of it just fine with only a 7" zipper.

Done and done. What's next?

Wednesday, September 7, 2011

What do Roosters have for Tea?

I don't actually know. And probably don't want to know.
But I'm pretty sure they would use this cute tea-towel to help keep things tidy.
No clue where I got the kit, but the fabric pieces have been fused to the towel for years now, and it was high time I stitched them down and finished it off.

Stitched by machine, using the blind hem stitch on my Bernina, set to a super-short stitch length and a moderate width (around 2, usually) with ordinary black thread.

Legs stitched by hand, 3 strands black DMC (310) in a stem stitch. Eye bead stitched on by hand as well.

While I had the machine all loaded up and set for my favorite applique stitch, I finished off a couple more tea towels from the fused-but-not-stitched pile.
Frankie pattern from Acorn Hollow by Art to Heart
Halloween Trio from a kit purchased at local craft fair
Sure, I know it's only September, but if I'd waited until October, I'd probably have forgotten them again.

(I may have finally broken through my crafting funk!)